

Create an invoice
An invoice asks a customer to pay for what you sold. It lists the products, the taxes and the total, and it states the date the money is due. When you confirm it, Aureus also writes the matching accounting entry, so your reports stay correct without extra work.
In simple words: You fill in a form, click Confirm, and the invoice becomes official. Then you send it and wait for the payment.
You use invoices every time you sell something and want to be paid. If the sale started in the Sales app, create the invoice from the order instead. See Order to invoice.
About the example
This page builds a small invoice for 4 Camping Hammocks ($299.00). Other pages in this guide follow a larger invoice, INV/2026/1, for the same customer. The steps are the same.
Open the invoice list with Invoices → Customers → Invoices or Accounting → Customers → Invoices. Both apps show the same screen.
In this page we use one example. The customer Azure Interiors buys 4 Camping Hammocks and must pay in 30 days.
The invoice list
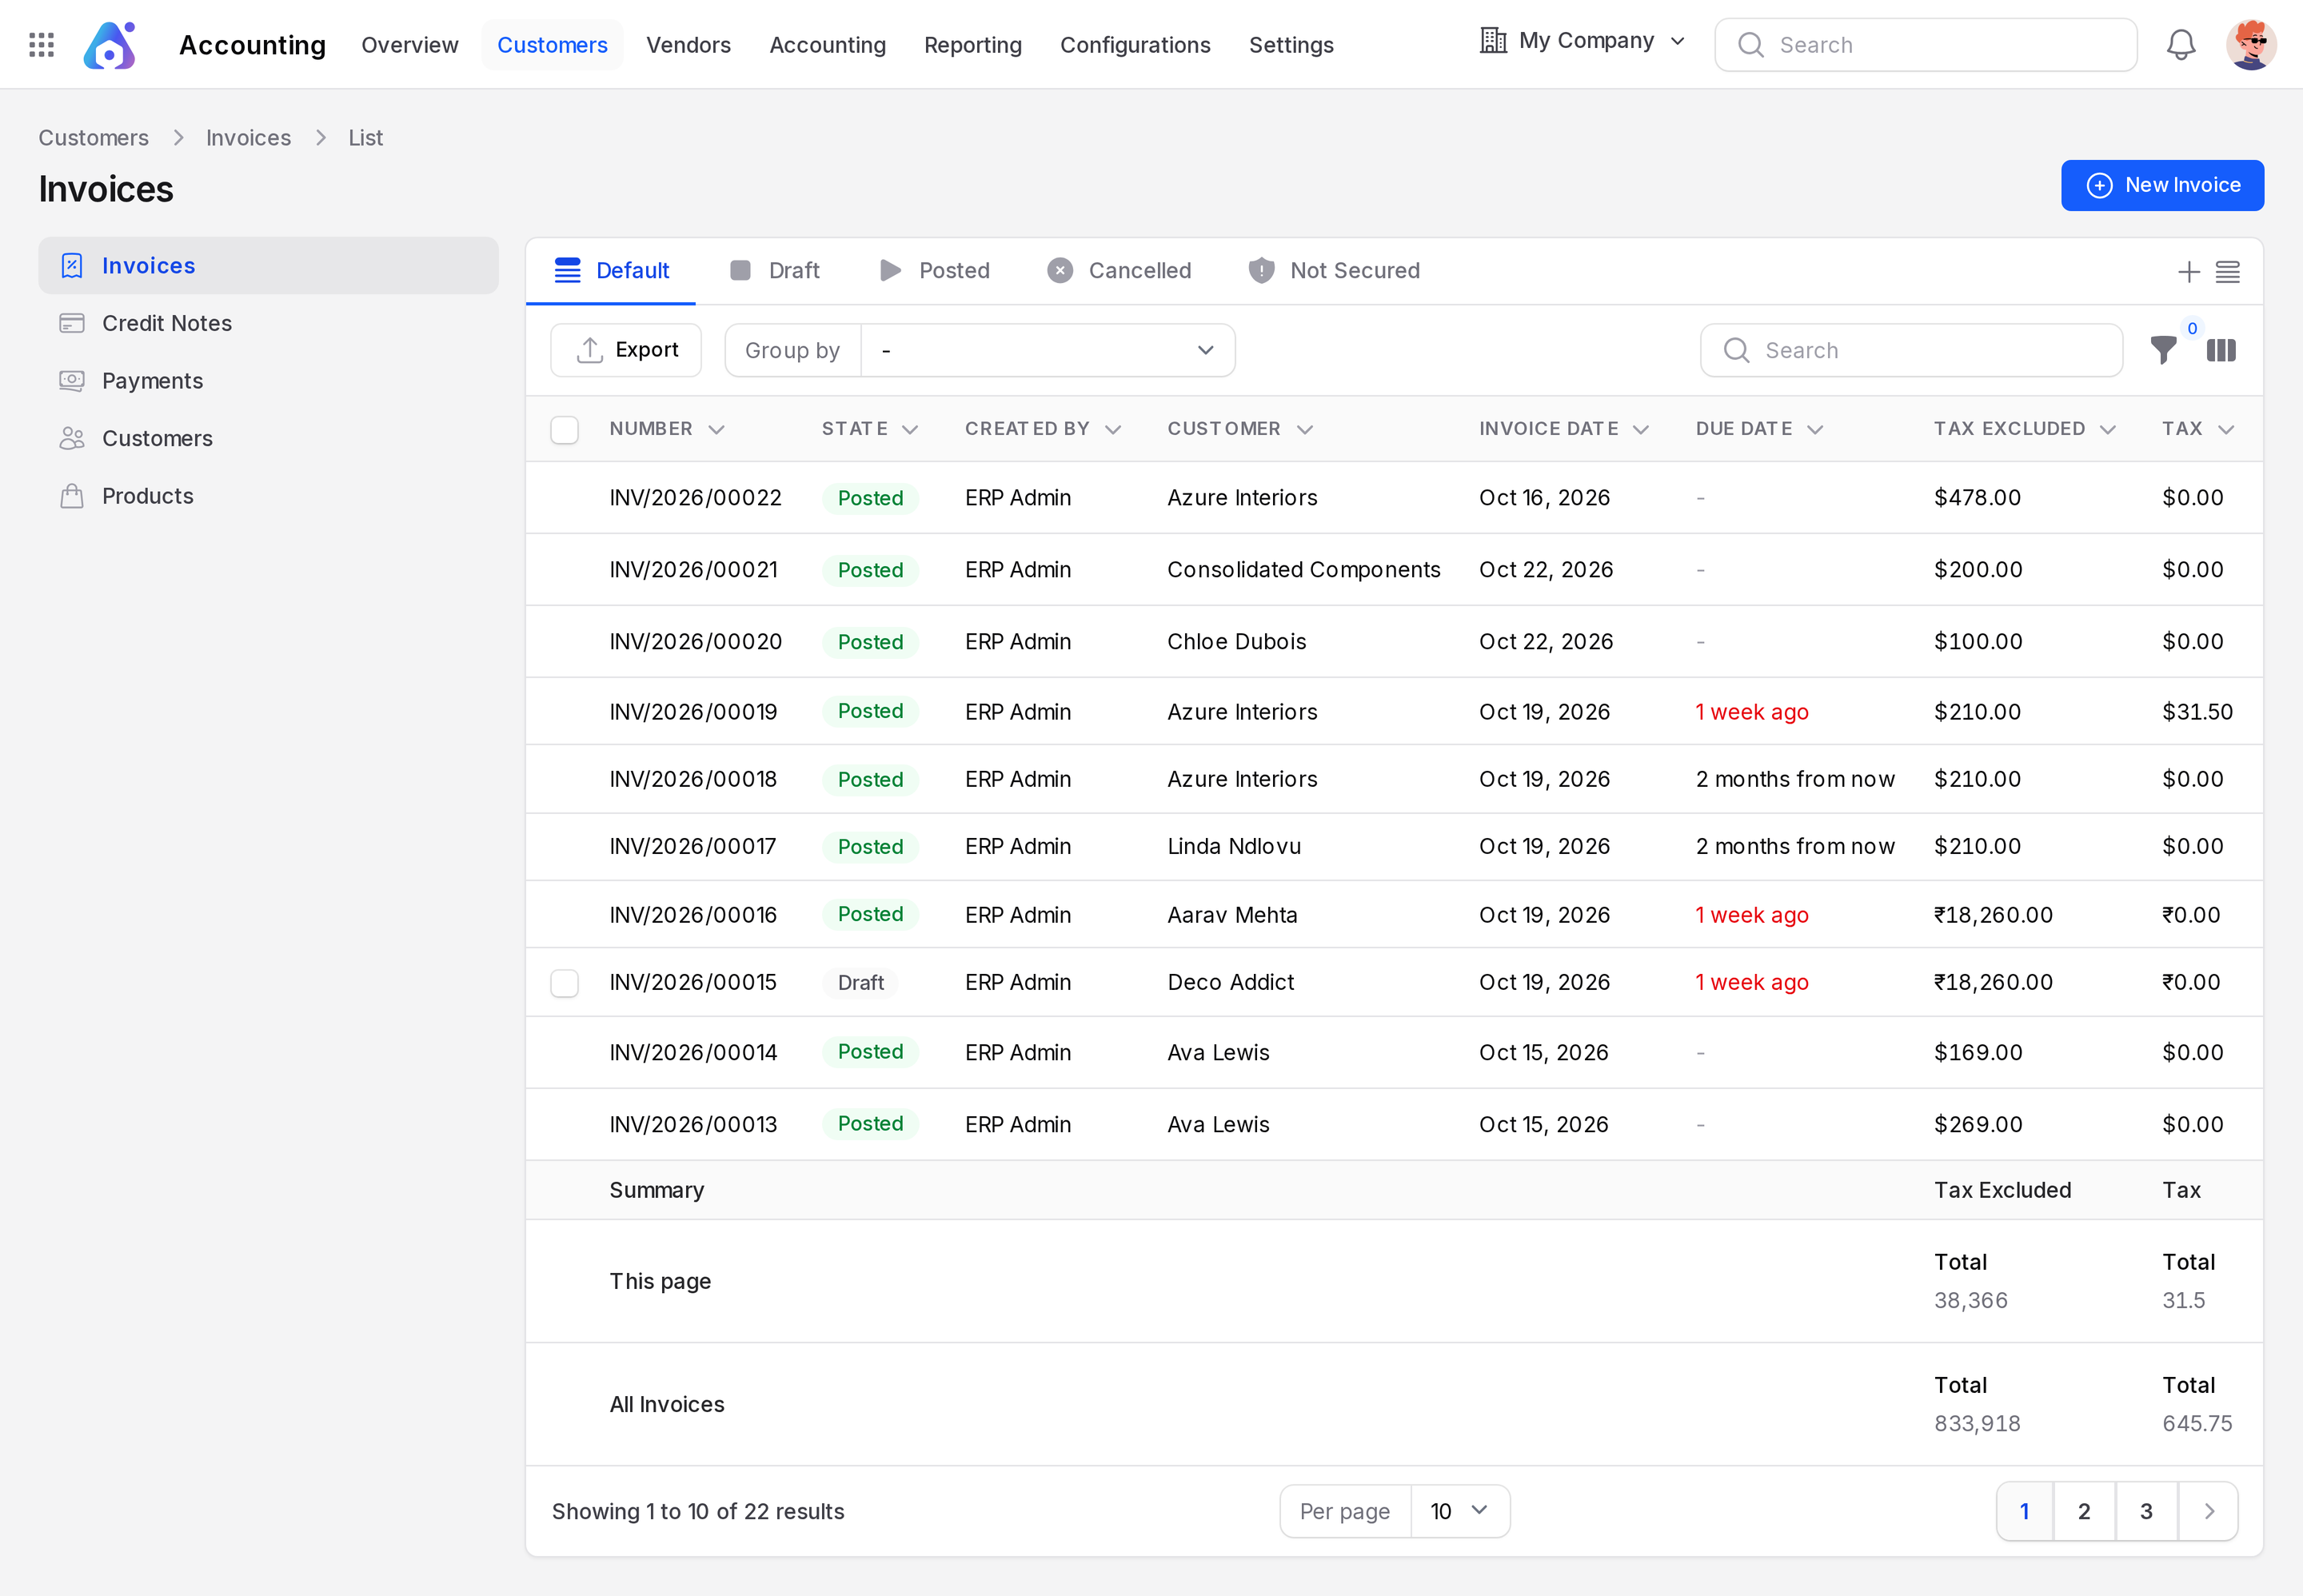
The list shows every invoice, newest first.
Views
The tabs above the list are ready-made views:
- Default: All invoices.
- Draft, Posted, Cancelled: Invoices in that state.
- Not Secured: Invoices that have no security hash saved.
- To Check: Posted invoices that nobody has marked as checked.
- To Pay: Posted invoices that still wait for payment.
- Unpaid: Posted invoices with an Amount Due above zero.
- In Payment: Posted invoices with the payment state In payment.
- Overdue: Not paid invoices whose due date is in the past.
If you cannot see all the tabs, click the three dots at the end of the tab bar.
Columns
The list shows Number, State, Created By, Customer, Invoice Date, Due Date, Tax Excluded, Tax, Total, Amount Due and Payment State. A summary row adds up the amounts you see.
Use the column toggle to show more: Checked, Accounting, Source Document, Reference, Sales Person and Invoice Currency.
Search, filter, group and export
- Type in the search box to find an invoice.
- Use the filter icon to build rules on fields such as Number, Customer, Invoice Date, Journal, Currency, Total Amount or Amount Due.
- Use Group by to fold the list by Customer, Invoice Date, Sales Person, Currency and more.
- Click Export to download the rows you see.
See Search, filter and group records.
Create an invoice
- Go to
Invoices → Customers → InvoicesorAccounting → Customers → Invoices. - Click New Invoice.
- Fill in the General section and the Invoice Lines tab.
- Click Create. Use Create & create another to save and open an empty form.
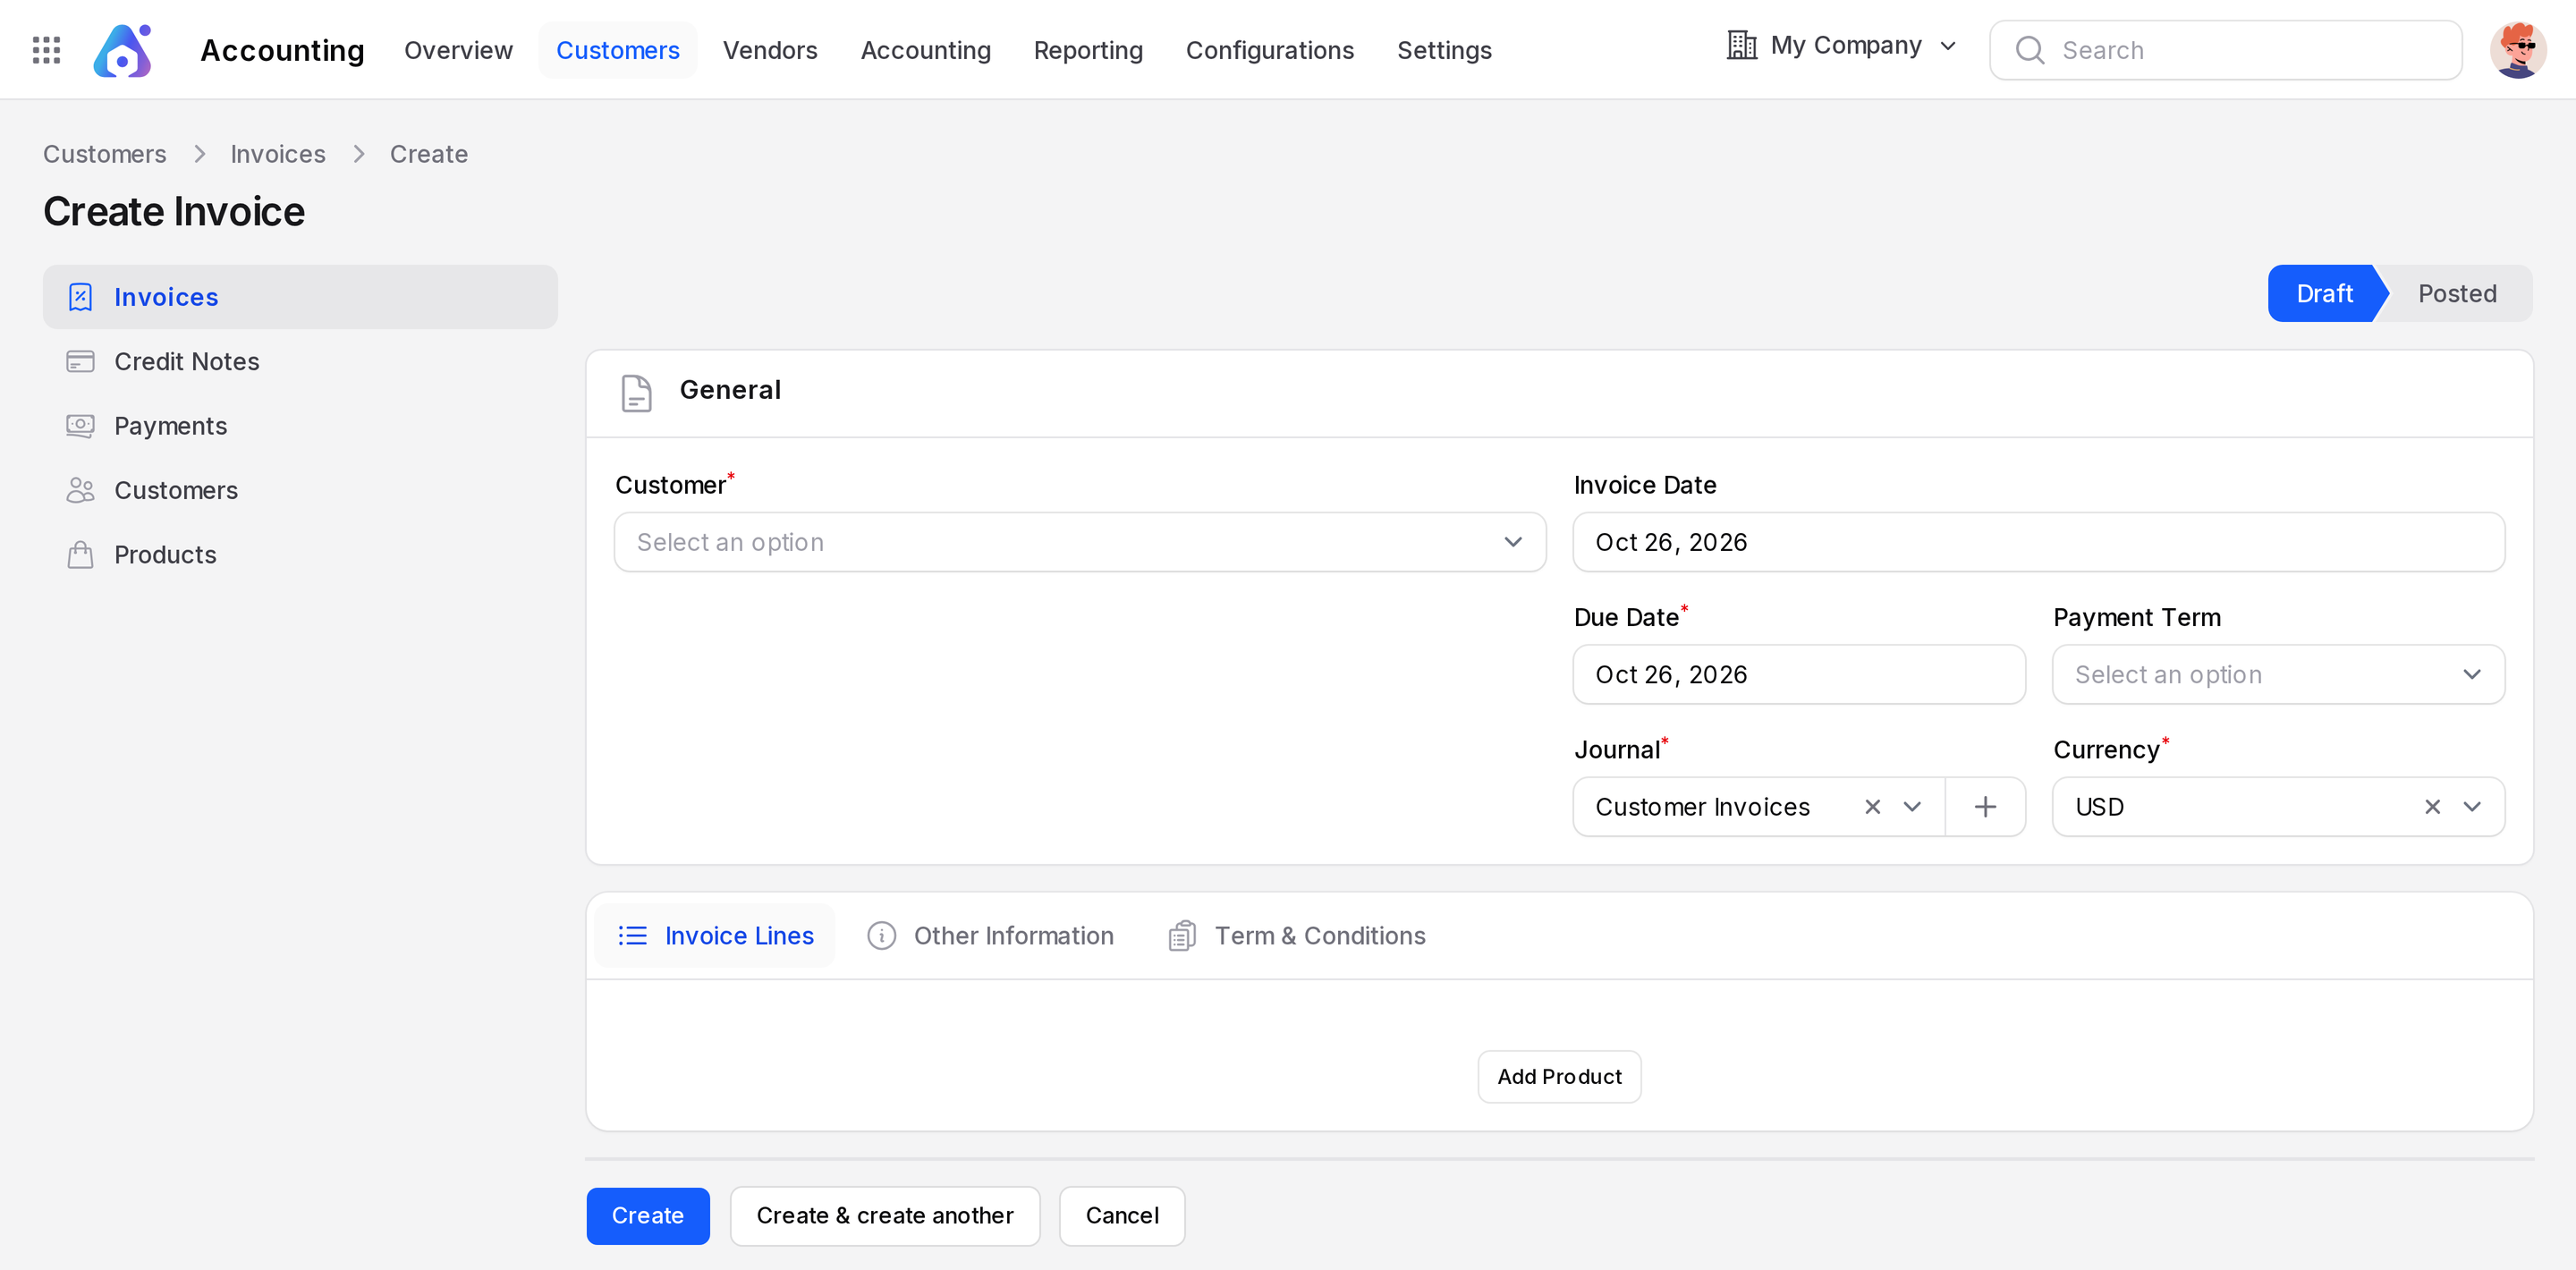
The state bar at the top shows Draft and Posted. A new invoice is a Draft.
General
- Customer: Who you invoice. Required. Pick an existing customer. To add one, see Contacts. This also fills Sales Person, Payment Term, Payment Method and the Recipient Bank from the customer record.
- Invoice Date: The date on the invoice. It starts as today. If you leave it empty, Aureus uses the day you confirm.
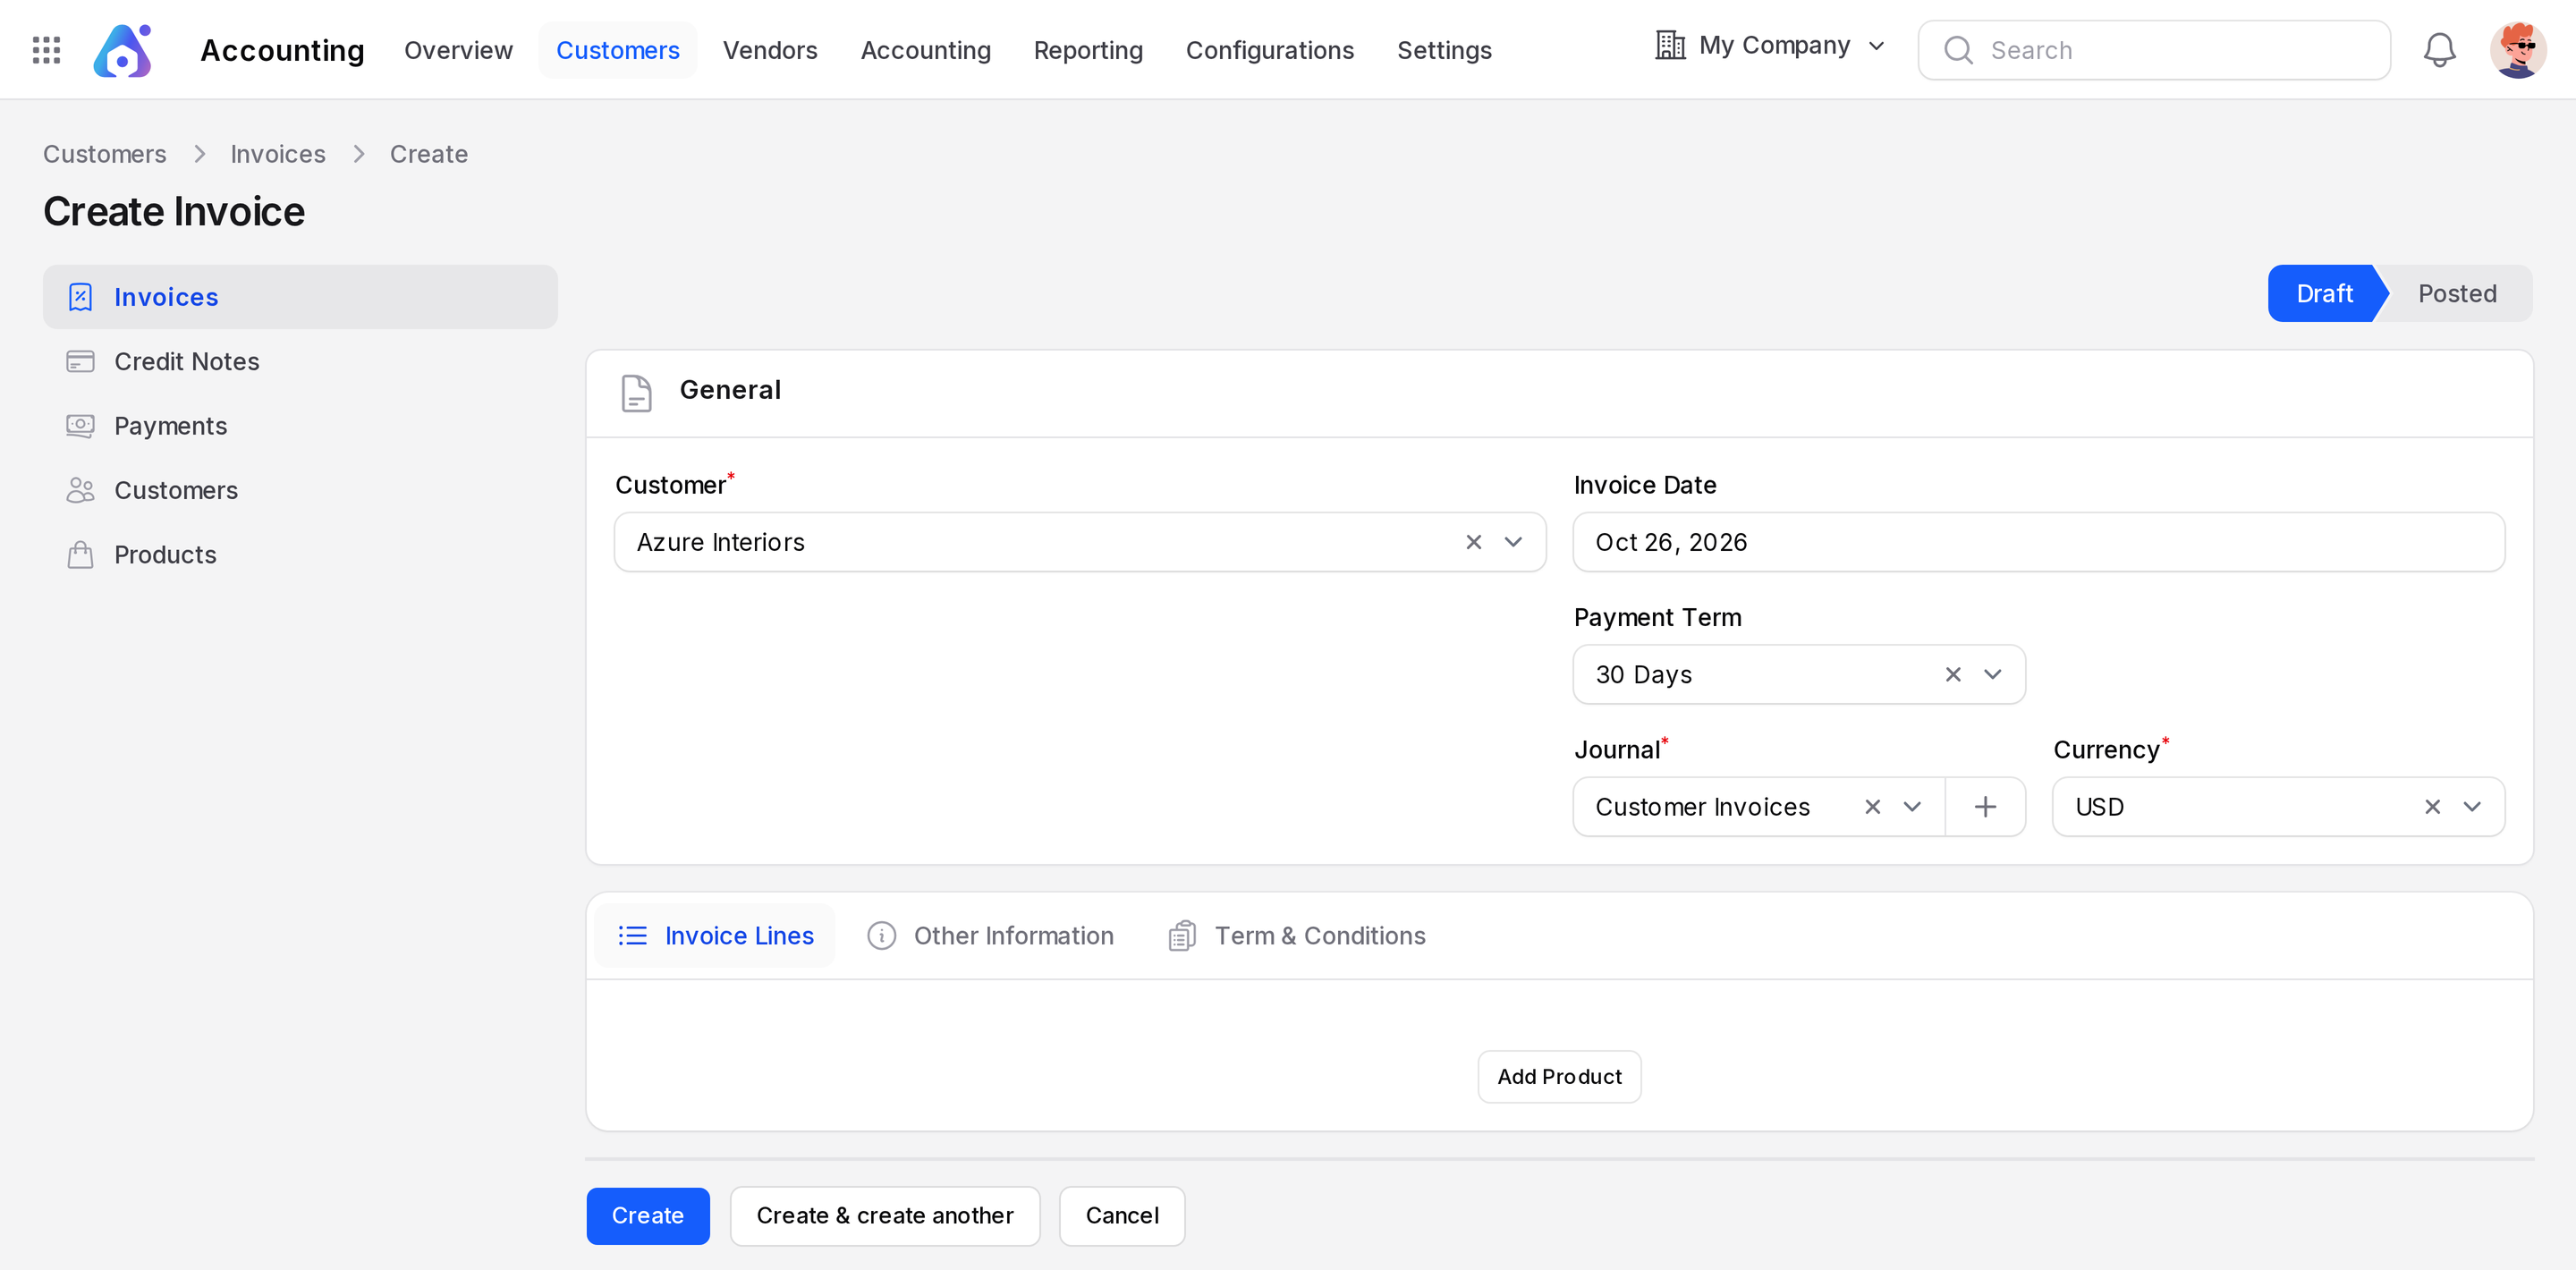
- Due Date: The last day to pay. Required. It is hidden when you choose a Payment Term, because the term then works out the date.
- Payment Term: The rule for when to pay, such as 30 Days. Pick one when you want Aureus to calculate the due date. See Payment terms.
- Journal: The accounting book where the invoice is recorded. Required. Only sales journals are listed, normally Customer Invoices.
- Currency: The currency of the invoice. Required. It starts as the currency of your company.
Example: Choose Azure Interiors. Pick 30 Days as Payment Term. Keep the journal Customer Invoices and the currency USD.
Invoice Lines
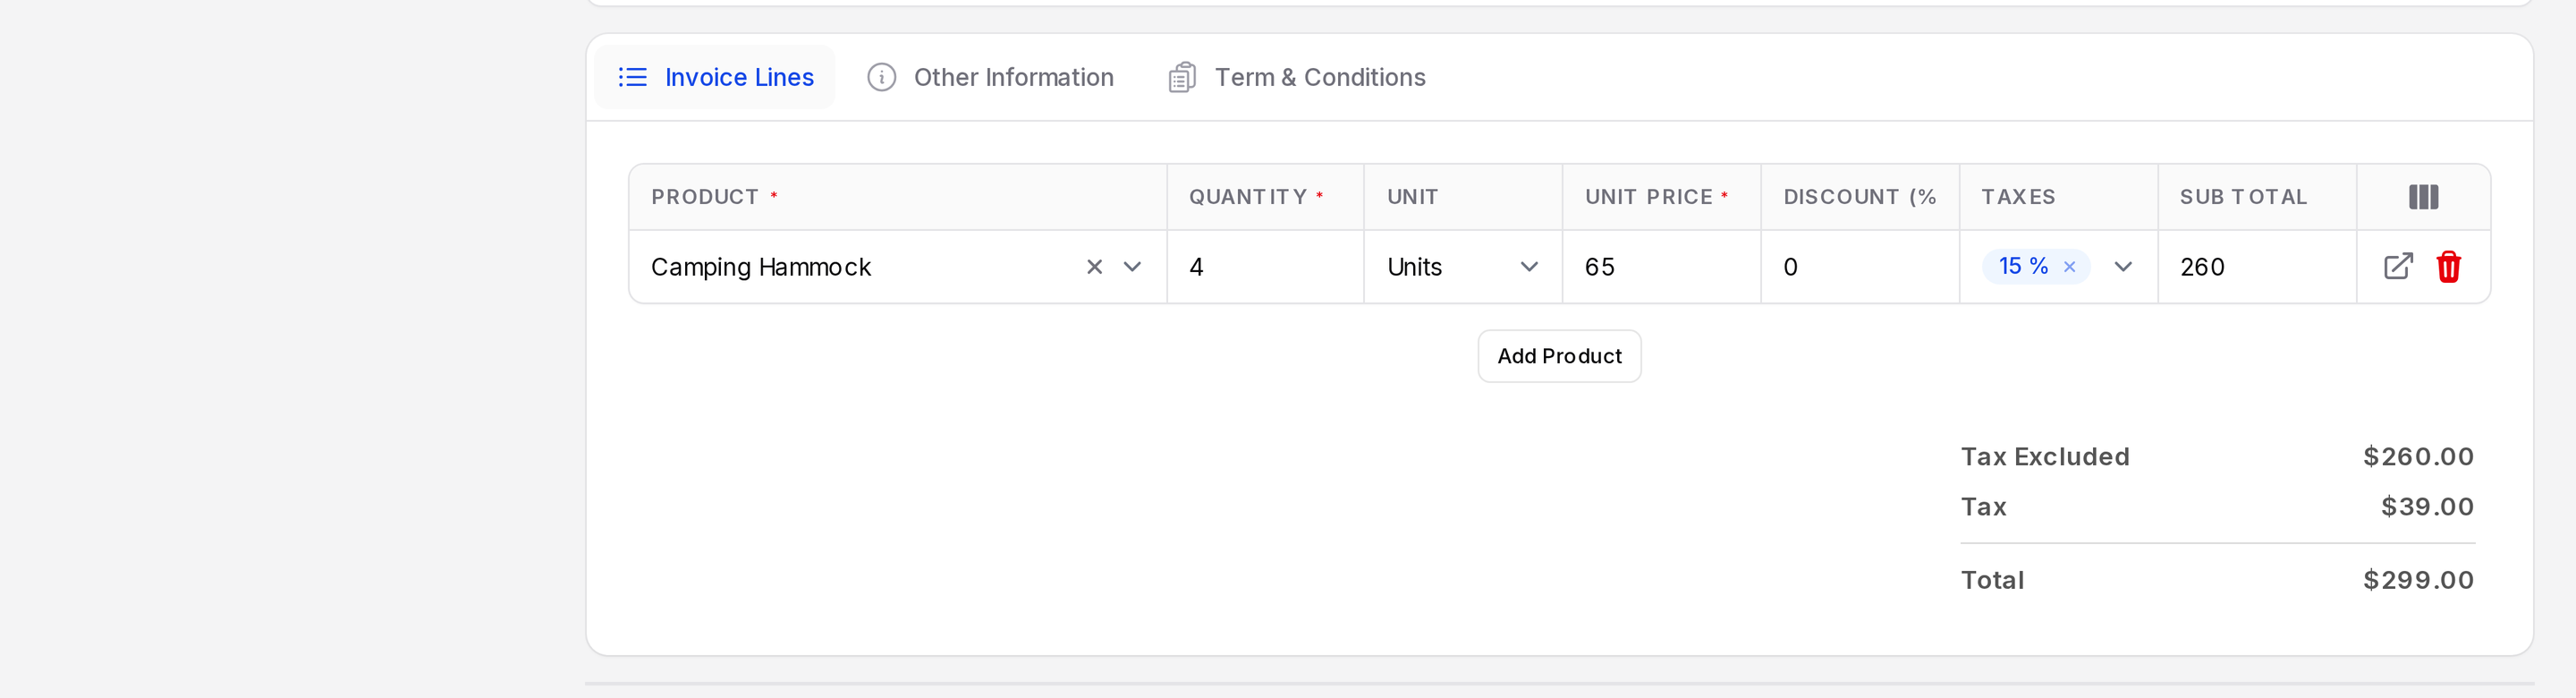
Each line is one product you sell.
- Open the Invoice Lines tab.
- Click Add Product.
- Choose the Product. Aureus fills the other columns.
- Change what is different for this customer.
- Product: What you sell. Required.
- Quantity: How many. It starts at 1.
- Unit: The unit of measure. It shows only when Unit of Measure is turned on in the settings.
- Taxes: The taxes on the line. They come from the product. You can add or remove them.
- Discount (%): A percentage taken off the line price.
- Unit Price: The price of one unit. It comes from the product. Type another price if needed.
- Sub Total: The line total before tax. Aureus calculates it.
Below the lines, a summary shows Tax Excluded, Tax and Total.
Example: Add Camping Hammock, quantity 4. The unit price is $65.00 and the tax is 15 %. The sub total is $260.00, the tax $39.00 and the total $299.00.
Other Information
This tab holds details that are optional. It has two blocks.
Invoice
- Customer Reference: The number the customer uses for this order, such as their purchase order. Print it so they can match your invoice.
- Sales Person: The employee in charge of the sale.
- Payment Reference: The text the customer should write on the payment, so you can match it.
- Recipient Bank: Your bank account that the customer should pay into.
- Delivery Date: When you delivered the goods.
Accounting
- Company: The company that issues the invoice. Change it only if you work with several companies.
- Incoterm: The delivery term, such as FOB. See Incoterms.
- Incoterm Location: The place that goes with the term, for example a port.
- Fiscal Position: Changes taxes and accounts for customers in other regions. See Fiscal positions.
- Cash Rounding Method: Shows only when cash rounding is turned on in the invoice settings.
- Payment Method: The way you expect to be paid.
- Checked: Tick it when someone has reviewed the invoice.
Term & Conditions
Type the notes you want on the invoice, such as bank details or late payment rules. They print on the invoice.
After you save
The invoice opens on its view page. The tabs are View, Edit and Payments. Inside the view, the tabs are Invoice Lines, Journal Items, Other Information and Term & Conditions.
Click Edit to change a draft. On a posted invoice, the customer, dates, payment term, journal, currency and lines are locked. You can still change fields such as Customer Reference, Payment Reference and Checked.
Buttons on the invoice
The header buttons change with the state.
On a draft invoice
- Confirm: Posts the invoice. The state changes to Posted. Aureus checks that the invoice has a customer and at least one line, that the total is not negative, and that the journal, currency and accounts are in use. If a check fails, a message tells you what to fix.
- Cancel: Sets the state to Cancelled. Use it for an invoice you no longer need.
- Delete: Removes the draft for good.
On a posted invoice
- Print & Send: Emails the invoice. See below.
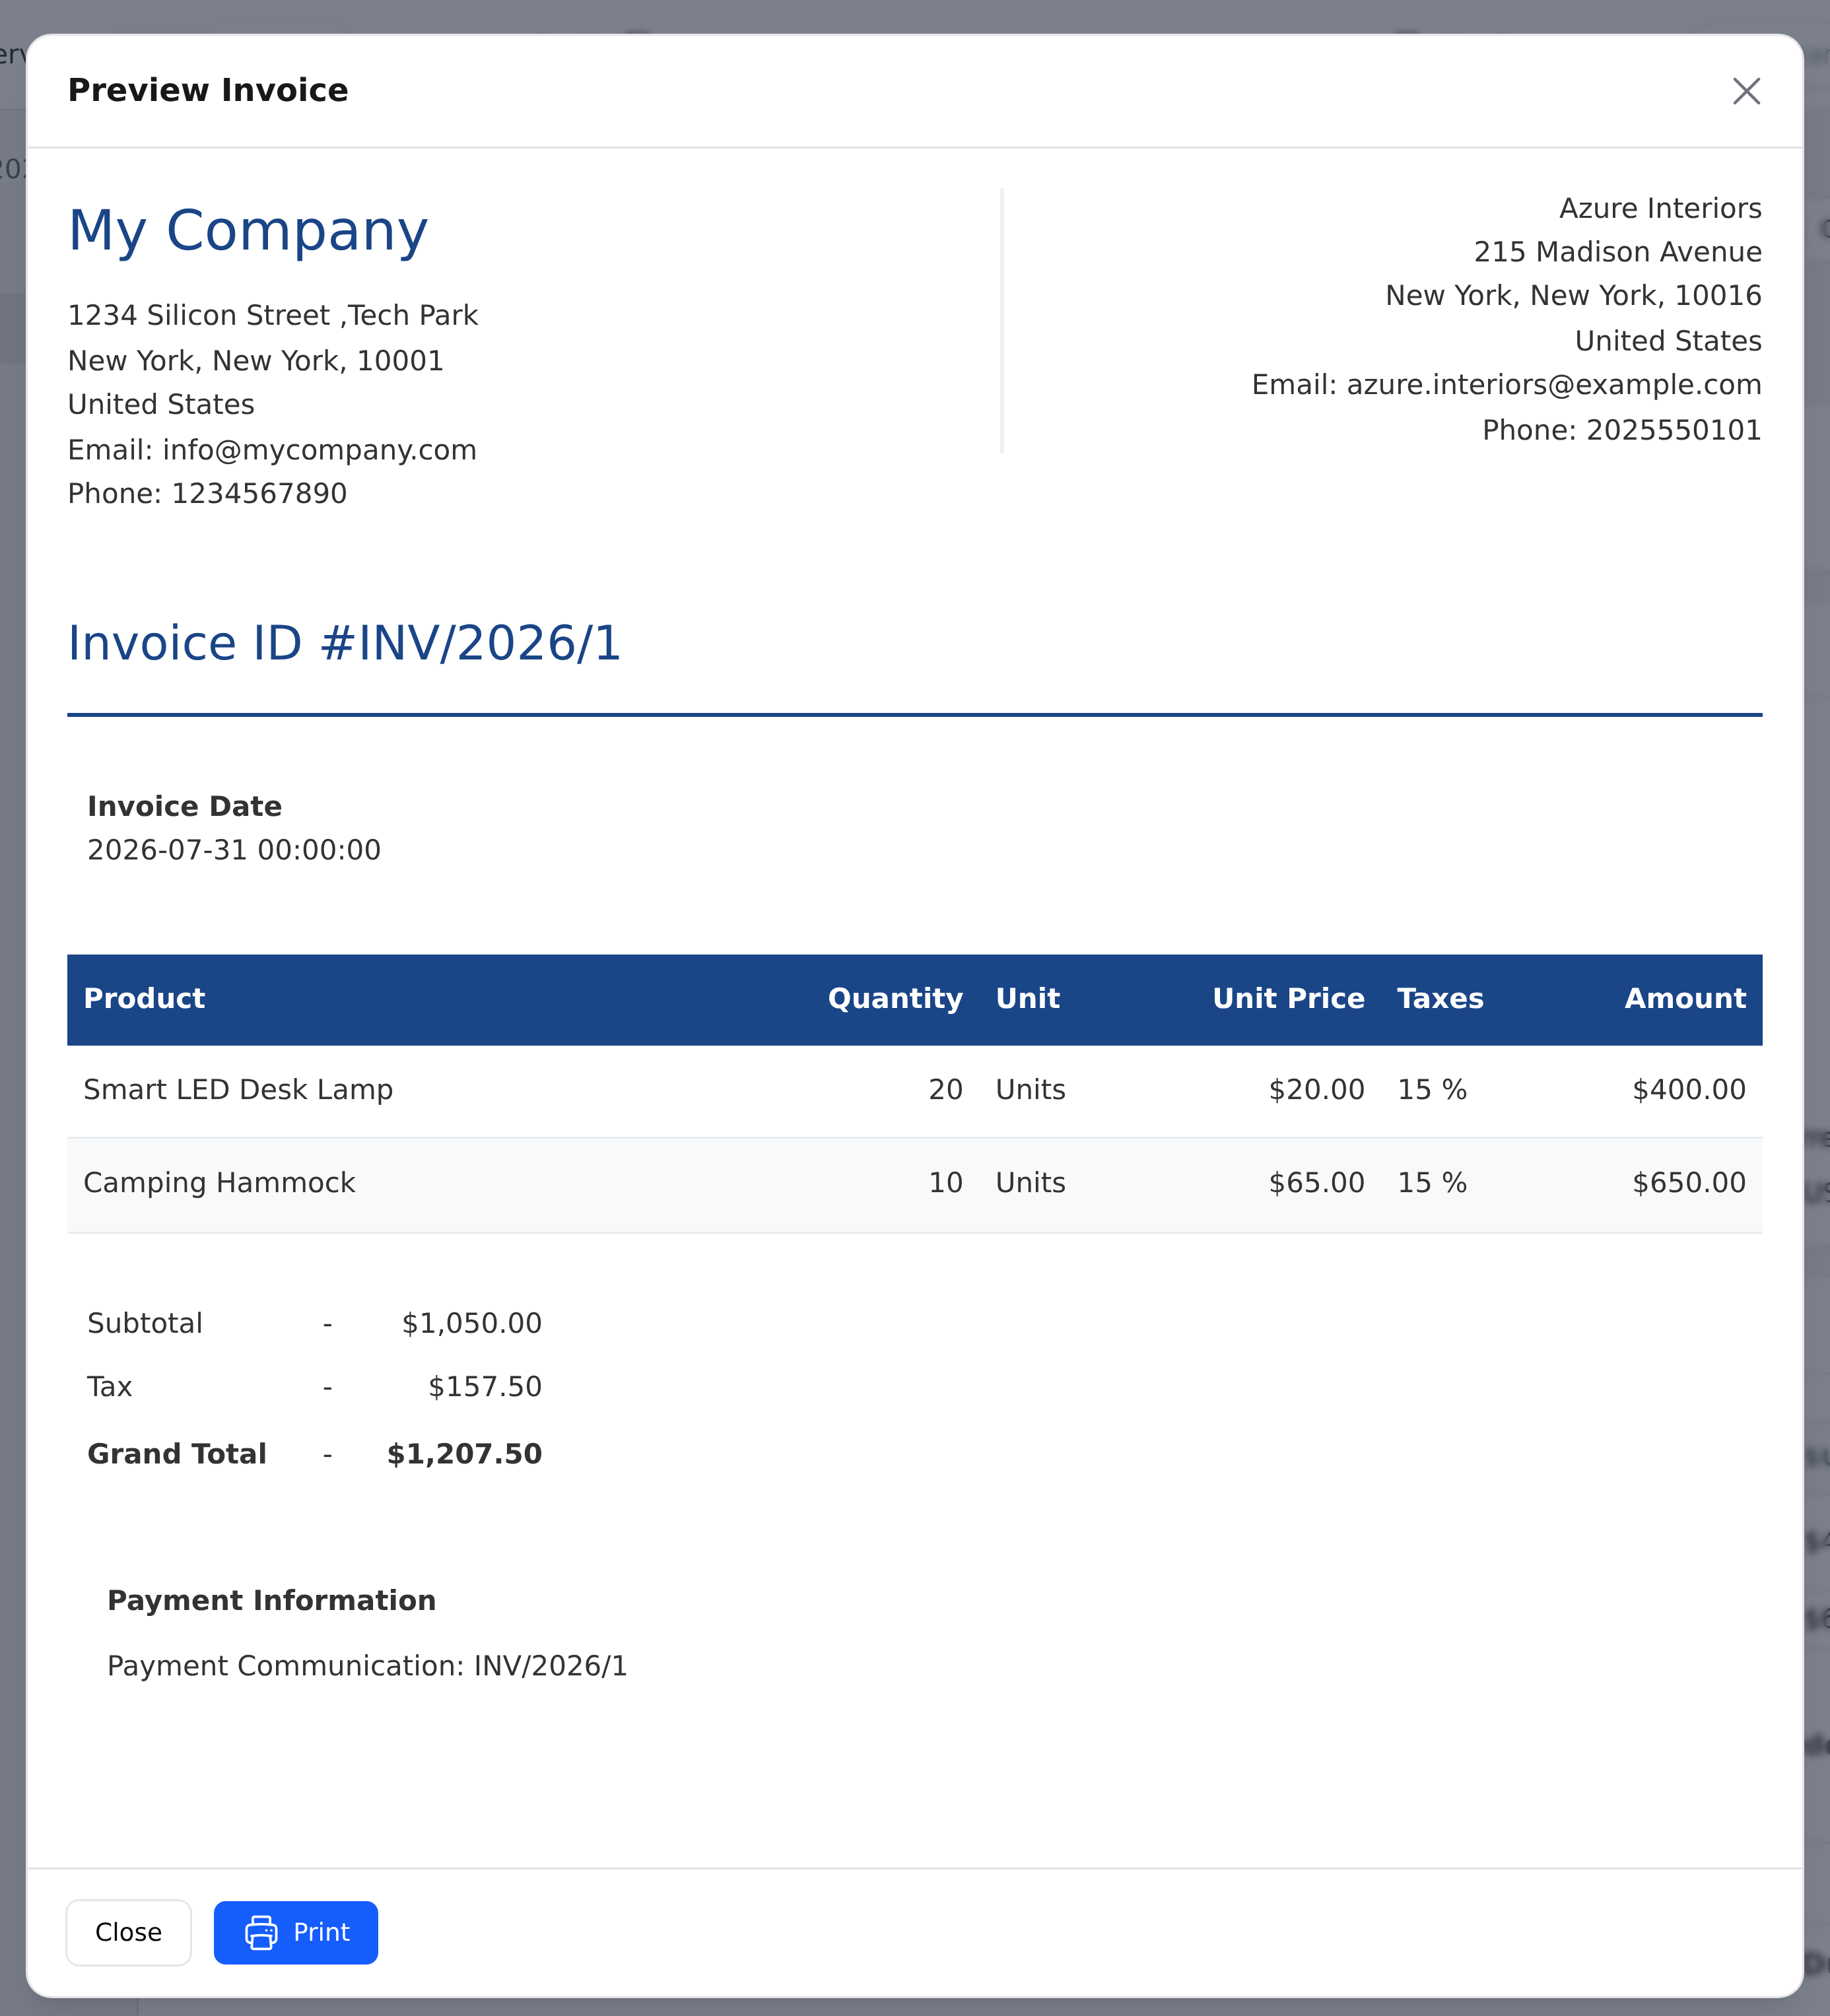
- Preview: Shows the invoice as the customer will see it, with Close and Print.
- Pay: Records a payment. See Register a payment.
- Set as Checked: Marks the invoice as reviewed. The button disappears afterwards.
- Credit Note: Cancels or reduces the invoice. See Credit notes.
- Reset To Draft: Moves the invoice back to Draft so you can edit it. Linked payments are unlinked and the payment state goes back to Not paid.
You can also Reset To Draft a cancelled invoice. A posted invoice cannot be deleted. Use a credit note instead.
The Chatter button opens notes, messages and activities. See Chatter and Activities.
WARNING
Use Reset To Draft with care. It unlinks every payment of the invoice. Re-check the payments afterwards.
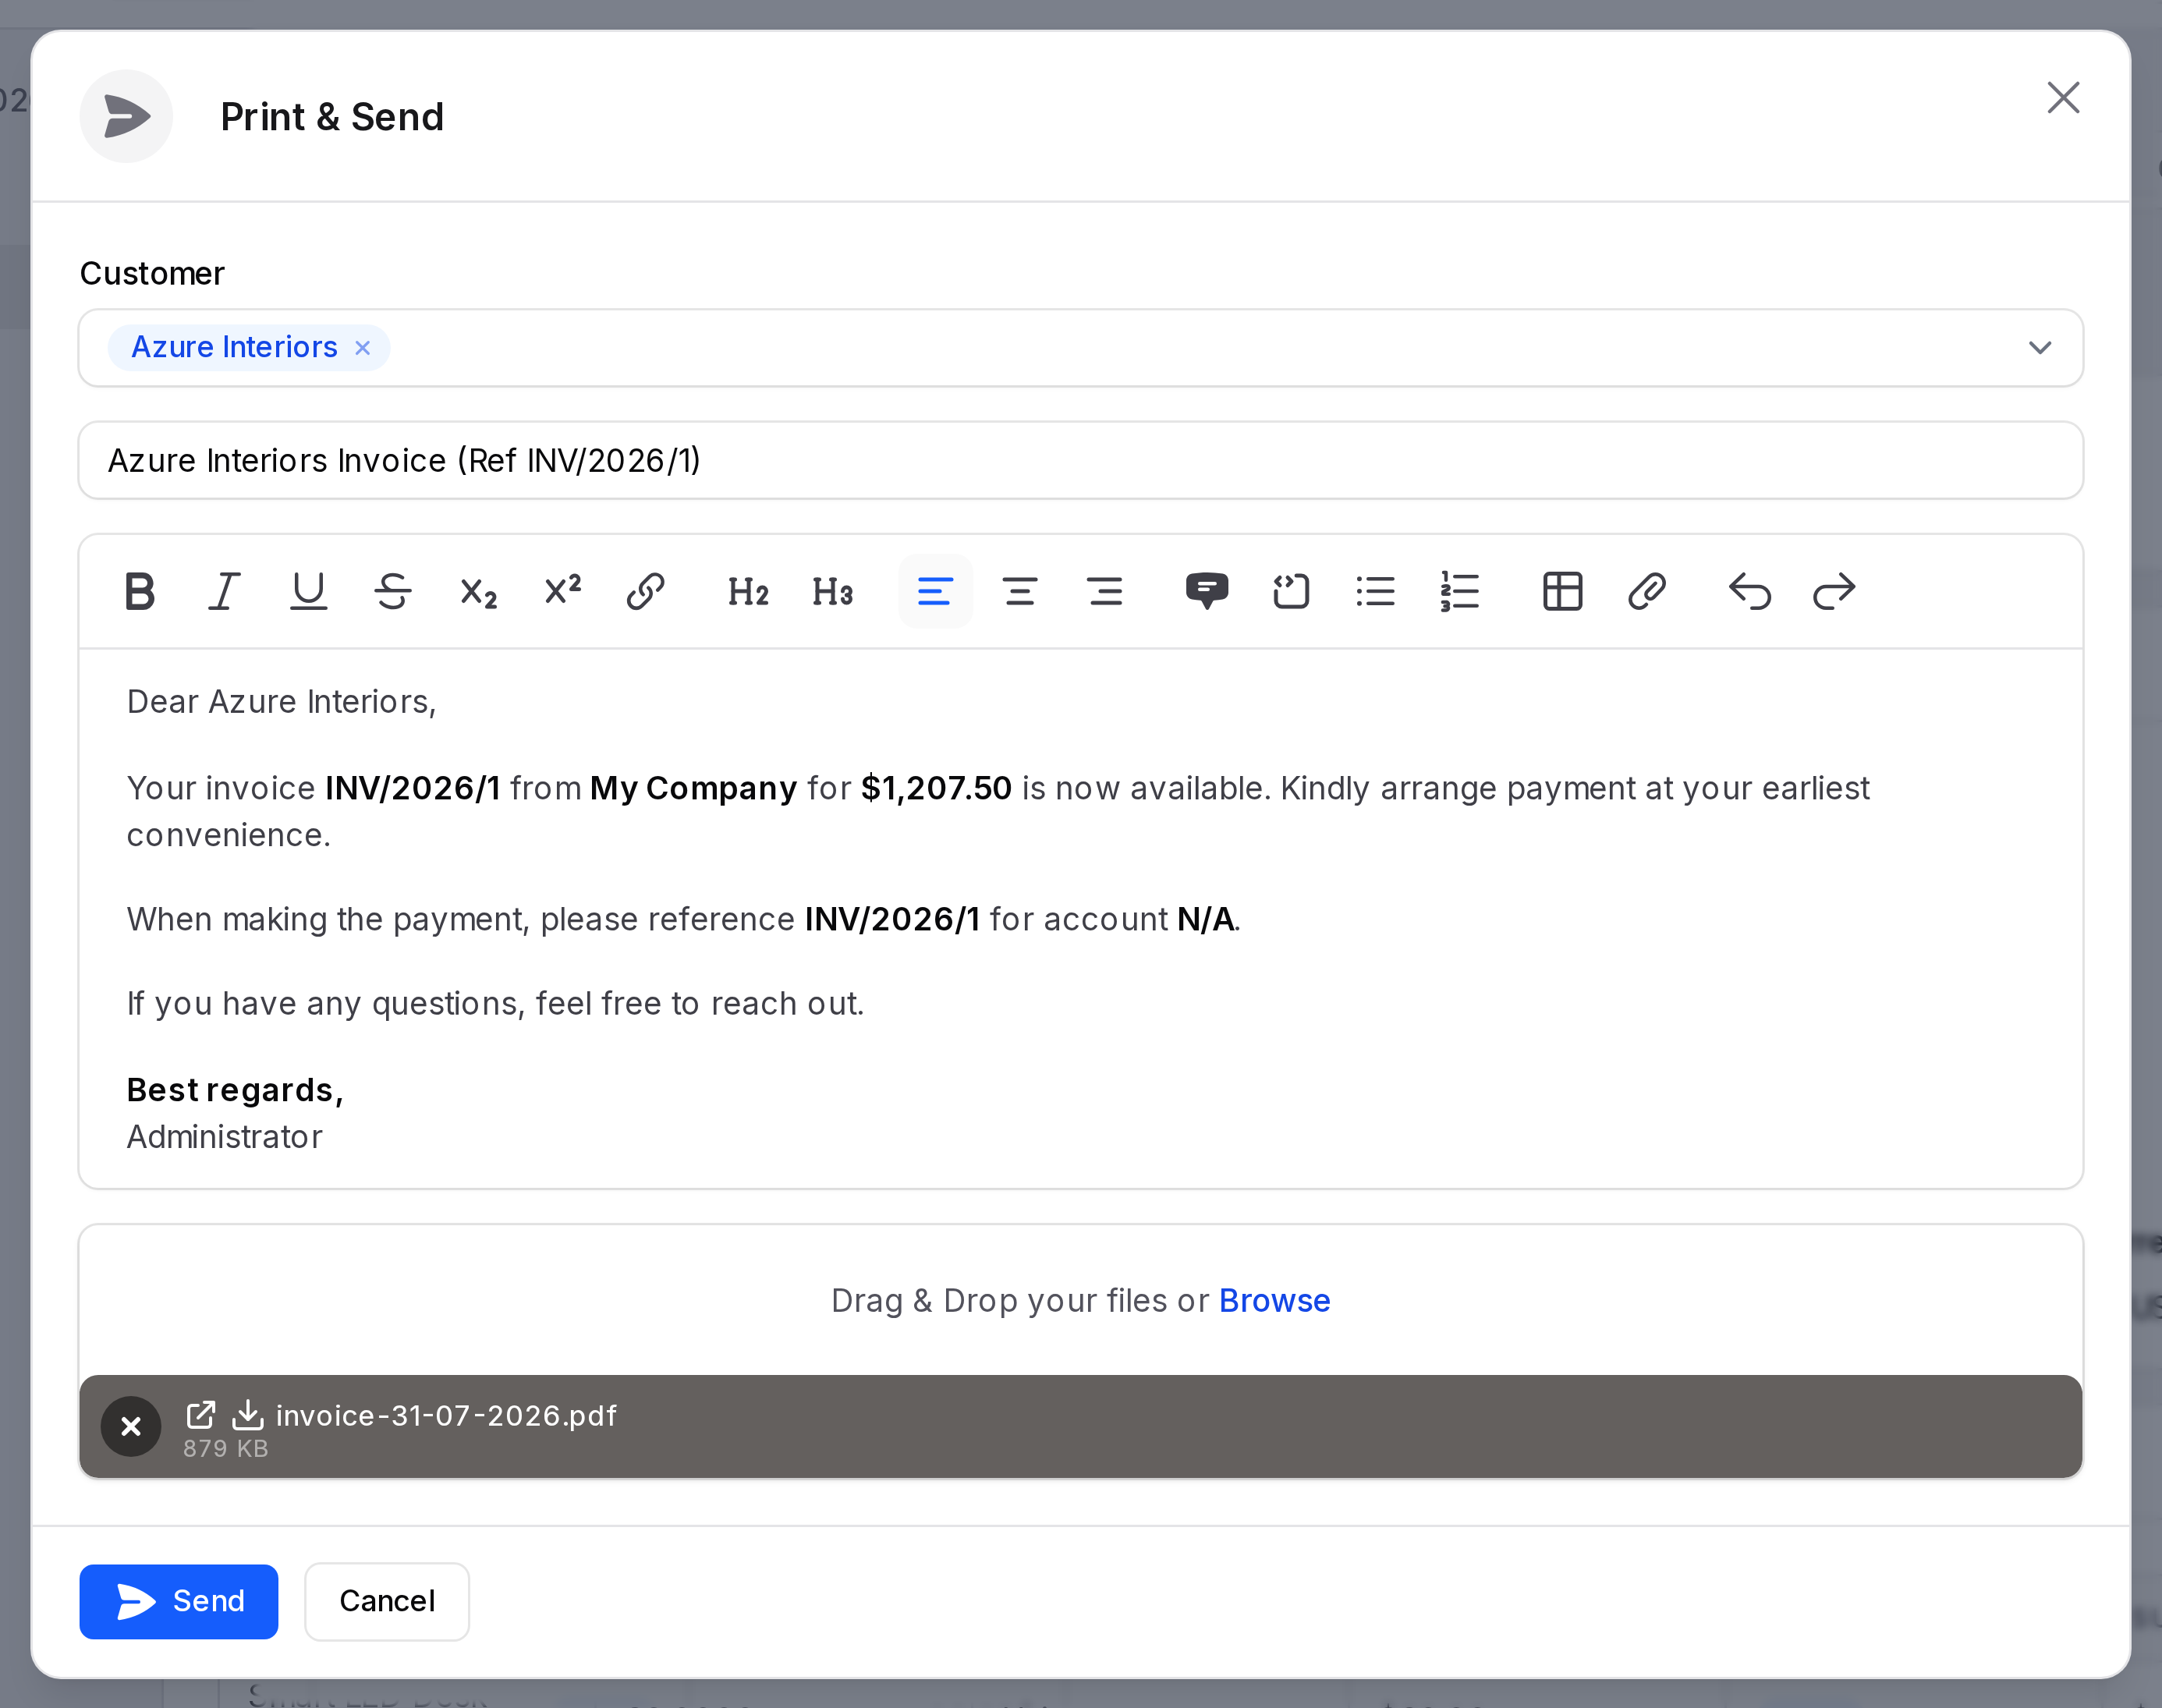
Print & Send
- Open a posted invoice and click Print & Send.
- Check the Customer list. Your customer is already chosen. Add more people if needed.
- Edit the Subject and the message Description.
- Check the Attachment. The invoice PDF is already attached. You can add images or PDFs.
- Click Send.
Aureus emails every selected customer who has an email address. It skips the others. You see the notification Invoice Sent, and the message is saved in the chatter.
Preview
Click Preview to see the printable invoice in a window. Click Print to print it or Close to leave.
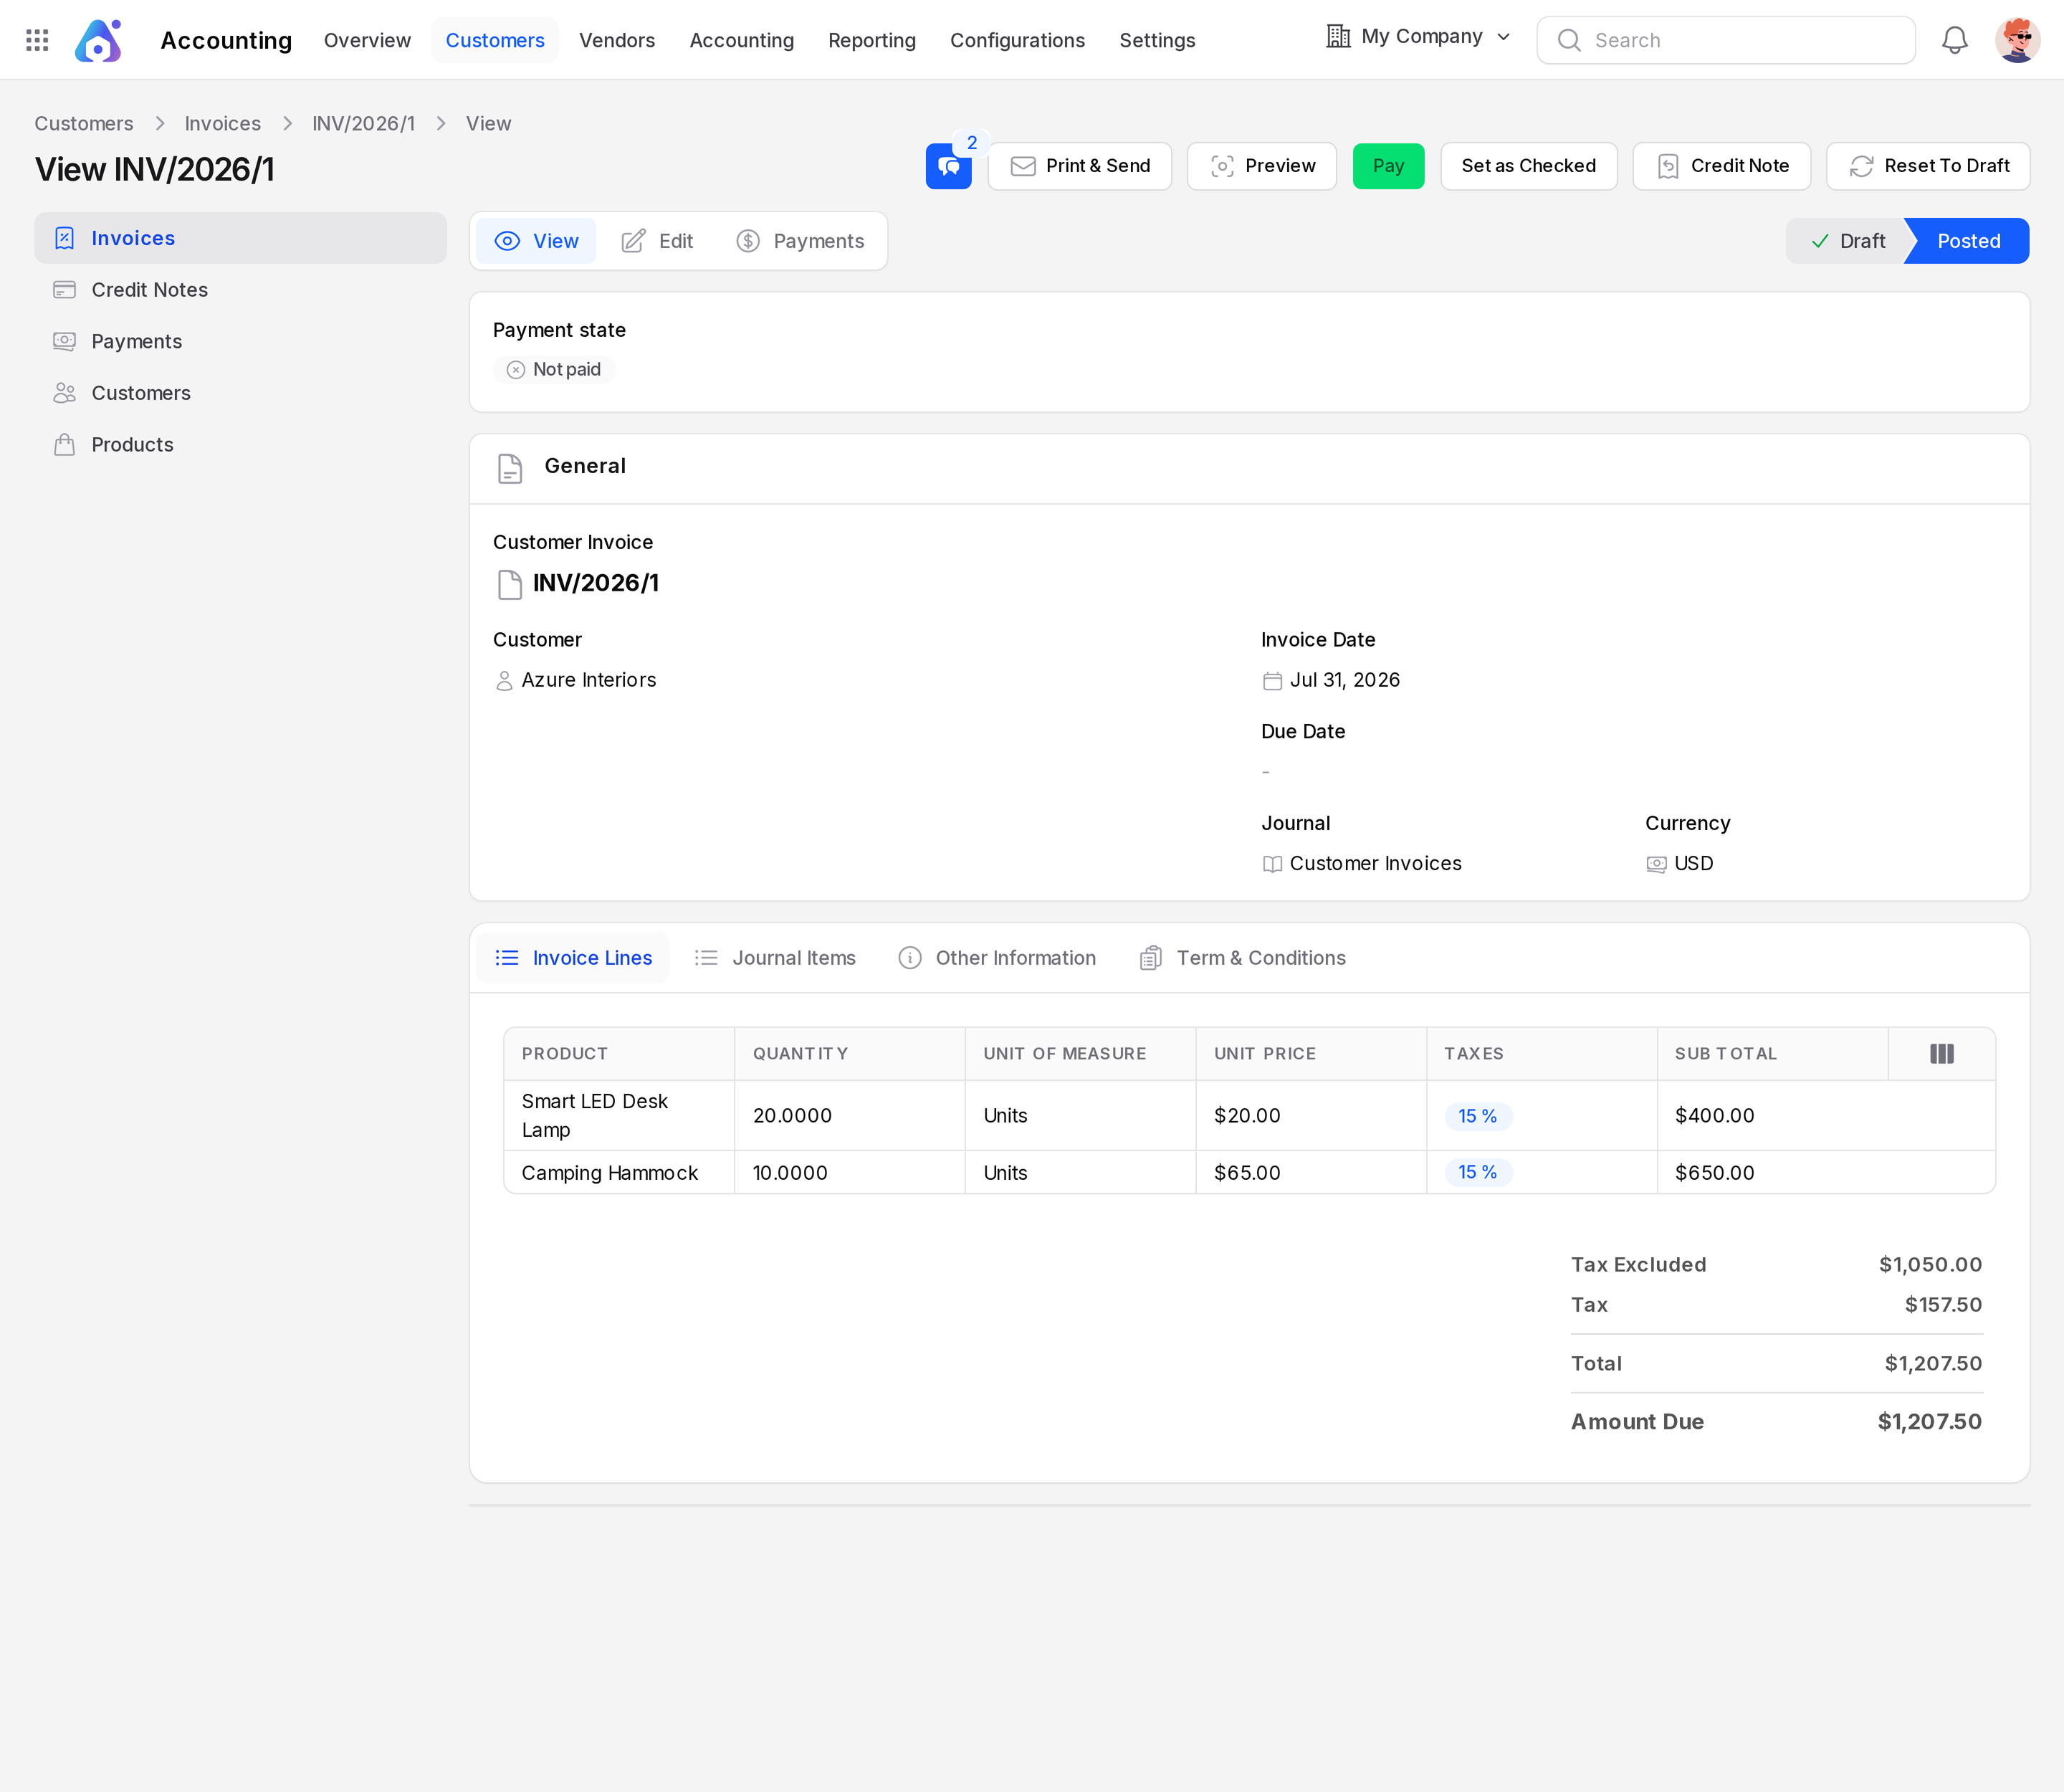
Payments and journal items
- Payments tab: Lists the payments linked to this invoice. Open one to see its details.
- Payment State: Shows Not paid, Partial, In payment, Paid or Reversed.
- Amount Due: Under the totals, it falls as payments arrive.
- Journal Items tab: Shows the accounting lines made when you confirmed: Account, Partner, Label, Currency, Due Date, Taxes, Debit and Credit.
Under the totals of a posted invoice you may also see:
- Unlink: Appears beside an applied payment. Click it to separate the payment from the invoice.
- Add: Appears beside an outstanding payment or credit of the same customer. Click it to apply it to the invoice.
Auto post
The Other Information tab of a saved invoice shows Auto Post as a tick or a cross. In daily use it is off, so you can ignore it. If an invoice is marked for auto post and its accounting date is in the future, the Confirm button is hidden until that date.
What happens when you confirm
- The state becomes Posted and the invoice keeps its number. See Invoice sequence.
- If the invoice date is empty, today is filled in.
- Aureus creates a journal entry. The customer balance goes up, and your income and tax accounts are credited.
- The customer is counted as a customer, so it shows in Customers.
Complete example
- Click New Invoice.
- Pick Azure Interiors and 30 Days.
- Add 4 Camping Hammock lines at $65.00. The total is $299.00.
- Click Create, then Confirm.
- Click Print & Send and Send.
- When the money arrives, click Pay.
Tips
- Use the Overdue view each week and chase the customers listed there.
- Fill in Customer Reference when the customer gave you a purchase order number.
- Tick Checked after your accountant has reviewed the invoice. The To Check view then shows only what is left.