

Manufacturing Orders
A Manufacturing Order (MO) is the primary document that drives production. It tells the system what to produce, how many units, from which BoM, by when, and who is responsible.
Once confirmed, an MO automatically:
- Reserves the required components from stock.
- Generates the underlying Work Orders (when Work Orders is enabled).
- Tracks consumption, by-products, and finished output.
- Updates inventory upon completion.
Use Case:
Create a Manufacturing Order every time you need to launch production — whether on customer demand, to replenish stock, or for an internal project.
In simple words: A Manufacturing Order is like a "production work ticket". It says "Make 10 chairs, using this recipe, starting on this date." The system then handles the rest — reserving wood, screws, and fabric, and telling each operator what to do.
Before You Begin — Setup Checklist
A Manufacturing Order is the last step of the manufacturing process. Before you can create one, a few building blocks must already exist in the system. Complete them in this order:
| Step | What to set up | Where | Guide |
|---|---|---|---|
| 1 | The finished product you want to manufacture | Manufacturing → Products → Products | Products |
| 2 | The raw materials / components used to build it | Manufacturing → Products → Products | Products |
| 3 | The Work Centers where production happens (optional — only if Work Orders is enabled) | Manufacturing → Configurations → Work Centers | Work Centers |
| 4 | The Bill of Material (BoM) — the recipe linking the product to its components | Manufacturing → Products → Bills of Materials | Bills of Material |
| 5 | The Operations — the shop-floor steps inside the BoM (optional — only if Work Orders is enabled) | Manufacturing → Configurations → Operations | Operations |
| 6 | The Manufacturing Order itself | Manufacturing → Operations → Manufacturing Orders | This page |
You also need the right capabilities switched on. Review the Manufacturing Settings page to enable Work Orders, Work Order Dependencies, or Byproducts depending on how detailed your production process is.
Enabling the 3-Step Manufacturing Route
By default, manufacturing happens in a single step (components go straight into production and finished goods go straight to stock). If you want a more controlled flow — pick the components → manufacture → store the finished product — you must enable the 3-step manufacturing route on your warehouse.
Turn on multi-step routes. Navigate to
Inventory → Settings → Manage Warehousesand enable Multi Steps Routes, then click Save Changes. See the Inventory Settings guide.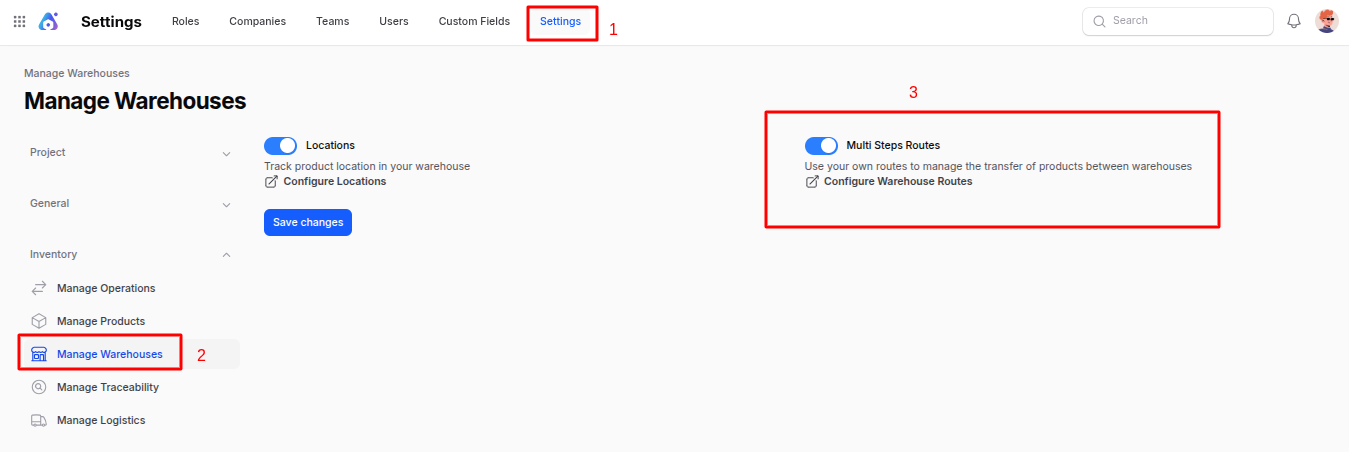
Edit the warehouse. Navigate to
Inventory → Configurations → Warehouse Management, open the warehouse you produce in, and click Edit. See the Warehouse Management guide.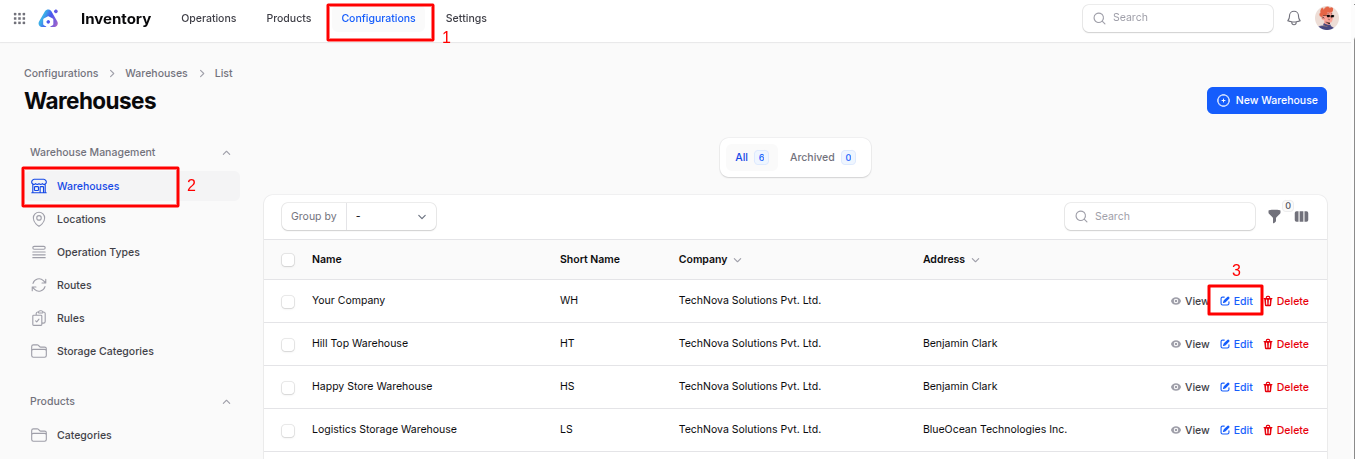
Select the 3-step manufacturing option. In the warehouse form, find the Manufacturing setting and choose Manufacture in 3 Steps (Pick components → Manufacture → Store).
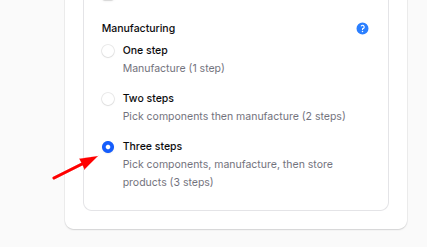
Save it. Click Save. The system automatically creates the extra locations and operation types (e.g. Pick Components, Manufacturing, Store Finished Product) needed for the 3-step flow.
Tip: Choose 1 Step for simple production and 3 Steps when you need to formally pick materials before production and put finished goods away after — useful for larger warehouses and audit trails.
Steps to Create a New Manufacturing Order
Navigate to
Manufacturing → Operations → Manufacturing Ordersas shown below: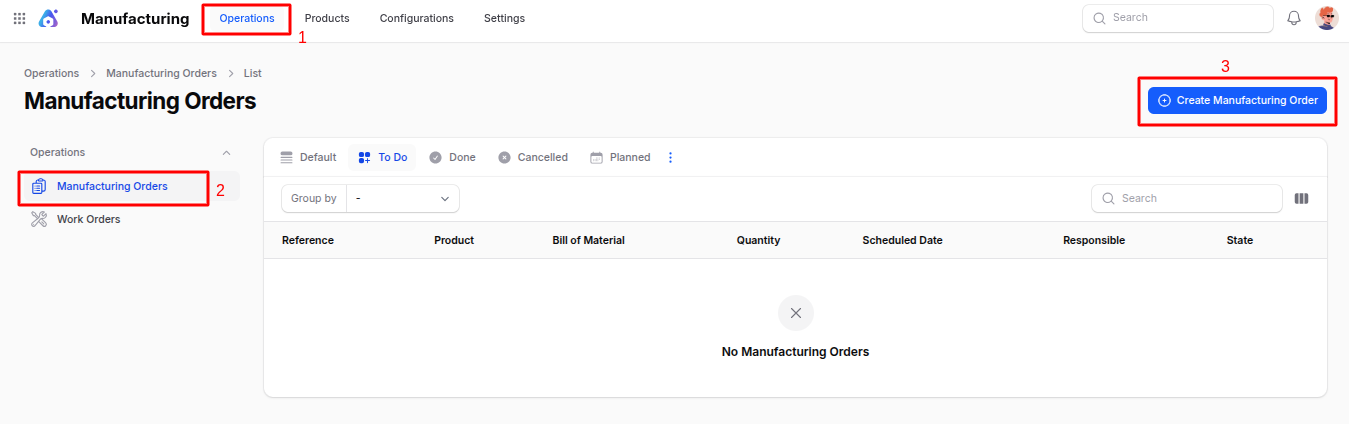
Fill in the following details:
General Section
- Product: The finished product to manufacture. It must already exist in Products.
- Quantity: Number of units to produce.
- UoM: Unit of measure for the quantity (auto-filled from the product).
- Bill of Material: Choose which Bill of Material (recipe) to use. If the product has only one BoM, it is selected automatically.
- Scheduled Date: Planned start date of production. The system uses this date along with the BoM lead time to plan operations.
- Scheduled End: Expected completion date based on operation durations.
- Responsible: User accountable for this manufacturing order.
- To Produce: Image preview of the finished product (read-only).
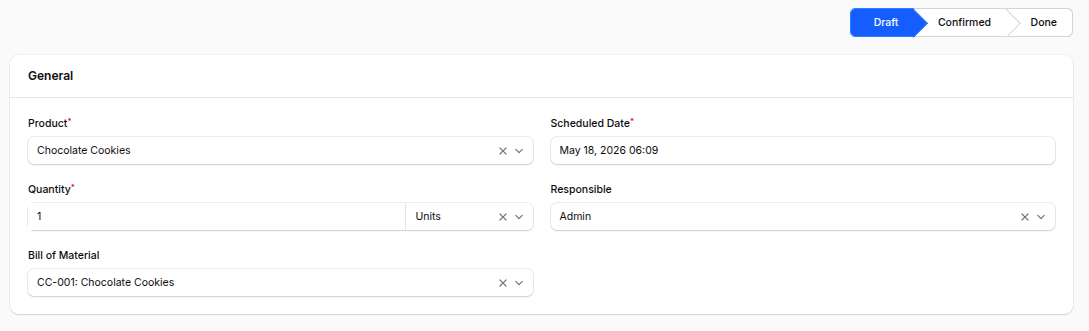
Configure the tabs below the general section.
Components Tab
Lists every raw material required to produce the planned quantity. Populated automatically from the selected BoM and refreshed whenever the quantity changes.
For each line:
- Product: The component.
- From: Source location (where the component will be picked from).
- To Consume: Quantity required for this MO. If the available stock is below this number, a tooltip indicates Insufficient quantity available.
- Quantity: Actual quantity consumed (filled in when production starts).
- UoM: Unit of measure.
- Forecast: Projected on-hand level after this MO consumes the component.
You can click Add a line to add an unplanned component on the fly.
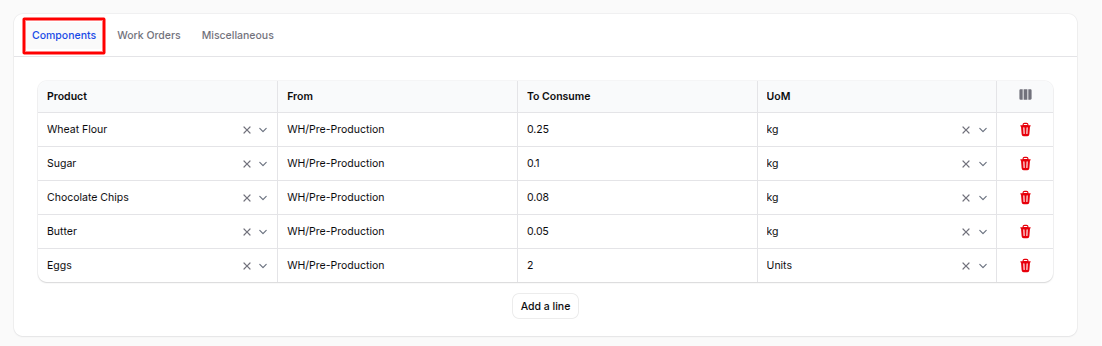
When the manufacturing process is still being built, you will see the note "Components will be generated as the manufacturing process is built." Confirm the BoM/quantity first to populate this tab.
Work Orders Tab
Visible when Work Orders is enabled. Lists every Work Order generated from the BoM's Operations.
Columns:
- Operation: The step name (e.g. Cutting).
- Work Center: Where the step runs.
- Product: Item being produced.
- Quantity Remaining / Produced: Live counters updated as operators record progress.
- Start / End: Scheduled or actual times.
- Expected Duration / Real Duration: Compare planned vs. tracked time.
- Status: Workflow state (Ready, In Progress, Pending, Done…).
- Lot/Serial: Lot or serial assigned at this step.
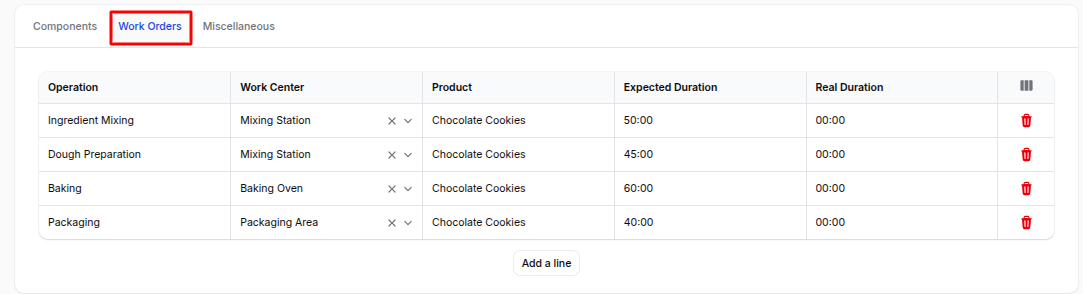
Miscellaneous Tab
- Operation Type: Warehouse operation that records the production (e.g.
Primary Warehouse: Manufacturing). - Source: Origin document — for example a sales order, replenishment, or another MO — that triggered this production.
- Finished Products Location: Stock location where finished units will be deposited (e.g.
Primary/Stock). - Company: Company that owns the MO.
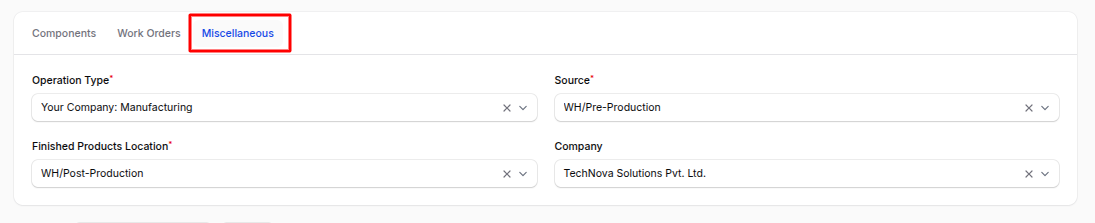
Action Buttons:
- Create – Save the MO as a Draft.
- Create & Create Another – Save and open another blank MO.
- Cancel – Discard.
Manufacturing Order Workflow
After creation, you are redirected to the MO View Page which exposes the full workflow.
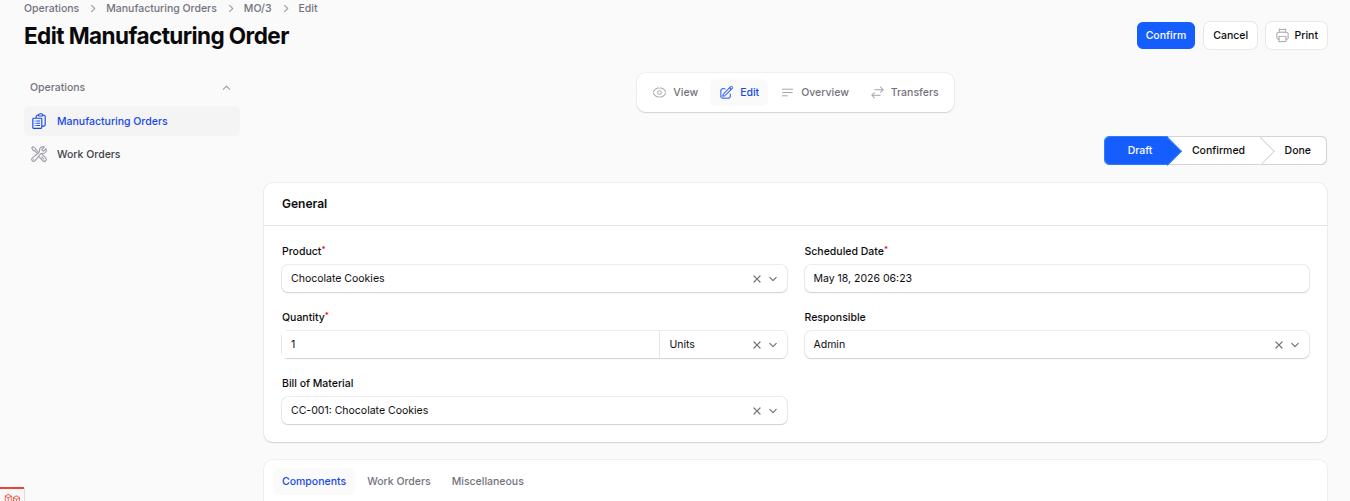
The MO progresses through the following states:
Draft → Confirmed → Planned → In Progress → To Close → Done
(with optional Cancelled from any state before completion.)
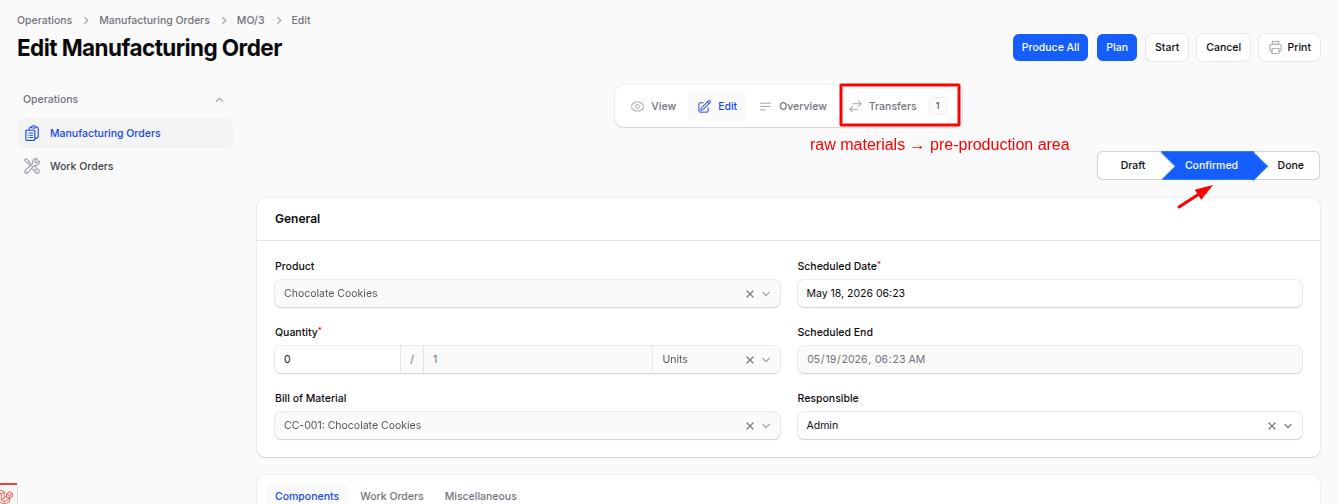
Behind the scenes — stock transfers. Every MO is backed by inventory transfers that physically move stock between locations. In a 3-step route the system creates a Pick Components transfer (raw materials → production area) and, after production, a Store Finished Product transfer (finished goods → stock). In a 1-step route both moves are posted automatically when you click Produce All. You can review and validate every transfer from the Manage Transfers tab.
Confirm
Click Confirm to validate the MO. The system reserves the required components, generates the work orders, and — in a 3-step route — creates the Pick Components transfer so the raw materials can be moved to the production area. The state changes to Confirmed.
Plan
Click Plan to schedule each Work Order on its Work Center based on capacity and dependencies. State becomes Planned.
Unplan
Click Unplan to release the scheduled slots — useful if dates or priorities change. The MO returns to Confirmed.
Start
Click Start to mark production as actively in progress. The first Work Order becomes available to operators. State becomes In Progress.
Validate the Component Pick Transfer
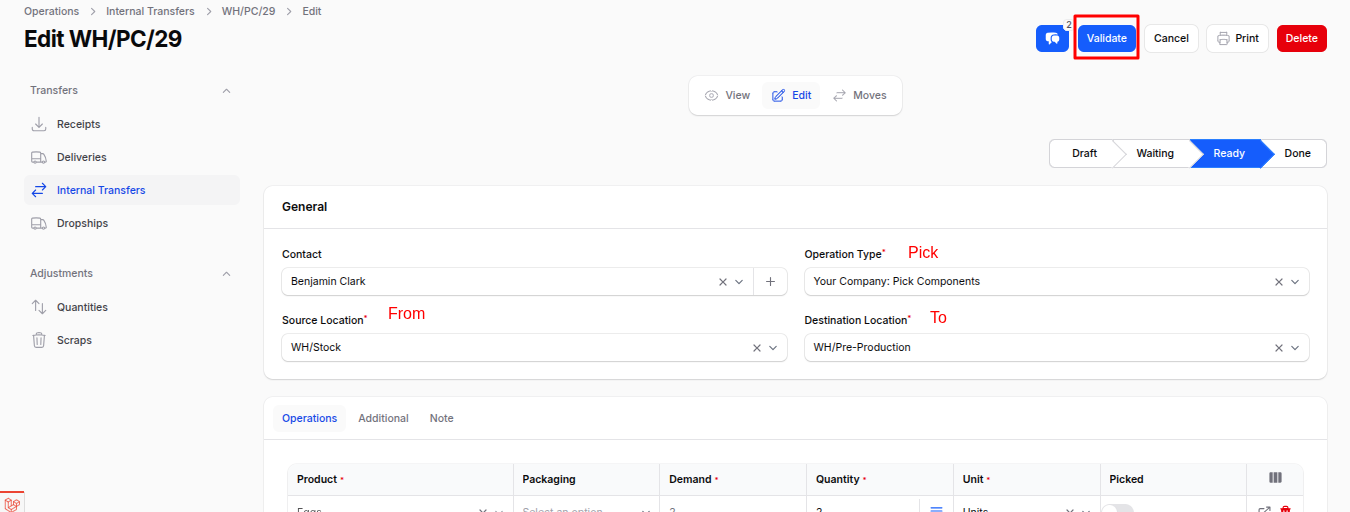
In a 3-step route, the raw materials do not leave their storage location until the Pick Components transfer is validated.
- Open the Transfers tab and edit the Pick Components transfer.
- Check the picked quantities, then click Validate.
- The components move from
Stockto the production location, and the on-hand quantity of each raw material is reduced accordingly.
Note — 1-step route: If your warehouse uses the 1-step route there is no separate pick transfer — component stock is consumed directly when you click Produce All.
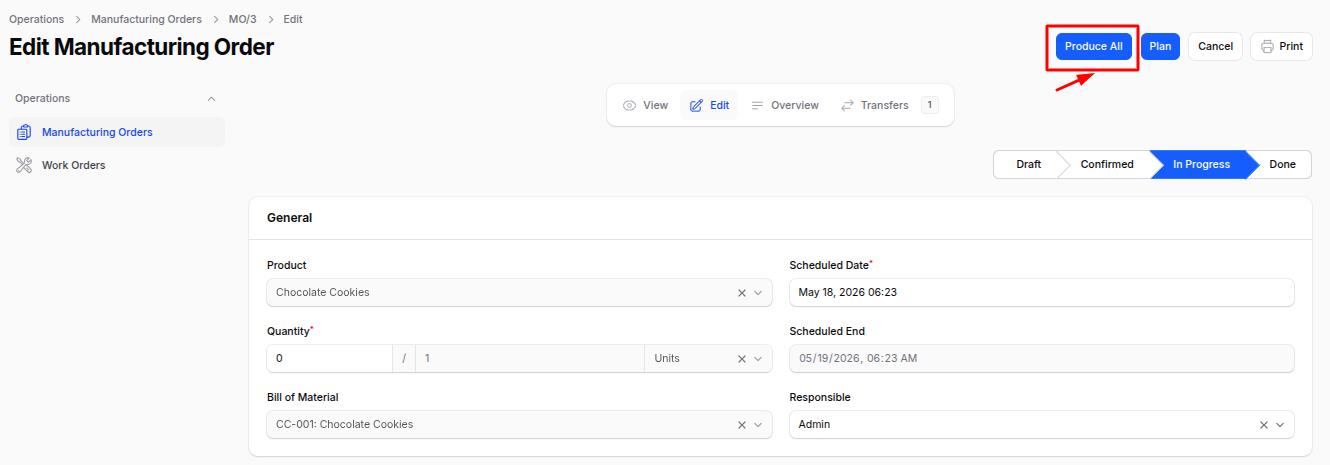
Produce All
Click Produce All to validate the MO and post the finished quantity. The system consumes the components recorded on the Components tab and, in a 3-step route, generates the Store Finished Product transfer for the newly produced units. State becomes Done.
If consumption or produced quantities differ from the plan, the system shows a Consumption Warning or Produced is different than expected dialog so you can:
- Confirm with the current quantities, or
- Click Set Quantities and Confirm to keep the planned values.
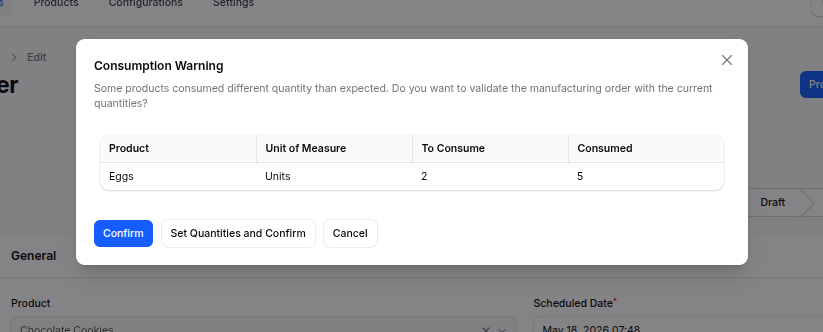
Note — Over-consumption warning: If an operator records more of a component than the quantity defined in the BoM, the system raises a Consumption Warning when you validate. The dialog lists each over- or under-consumed component so you can either accept the actual quantities or click Set Quantities and Confirm to revert to the planned BoM values. The same check applies to output — producing more or fewer units than planned triggers the "Produced is different than expected" dialog.
Store the Finished Product
In a 3-step route, the finished units are not added to sellable stock until the Store Finished Product transfer is validated.
- Open the Transfers tab and edit the Store Finished Product transfer.
- Verify the quantity and destination location, then click Validate.
- The finished goods move into
Stockand become available for sale or further production.
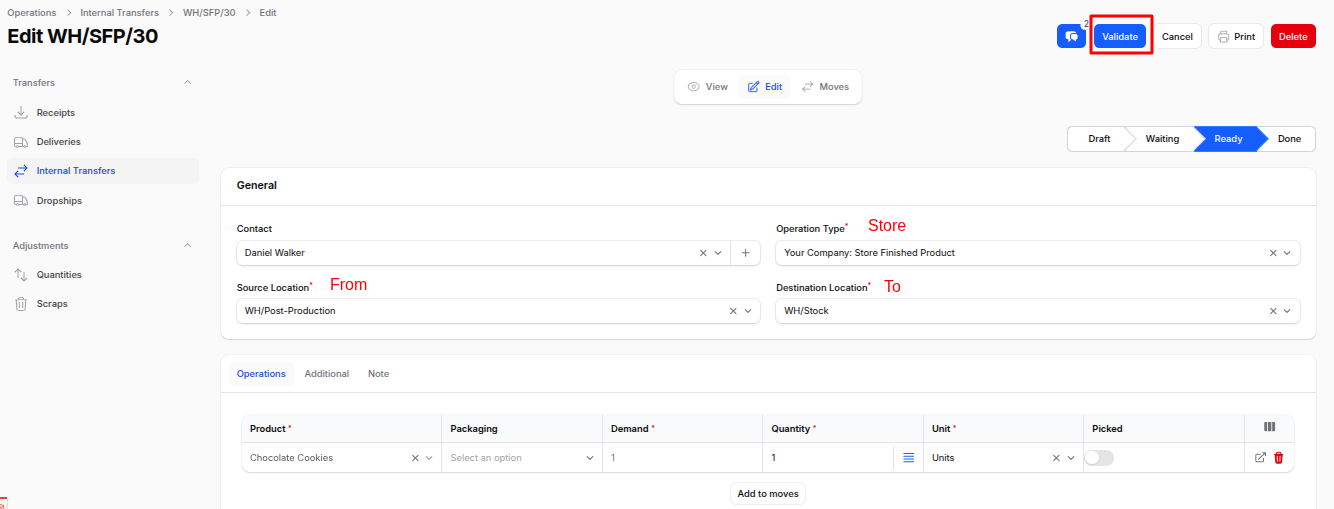
In a 1-step route the finished goods are posted to stock immediately on Produce All — no separate transfer is needed.
Cancel
Click Cancel at any point before completion to abort the MO. Reserved components are released. State becomes Cancelled.
Other Page Actions
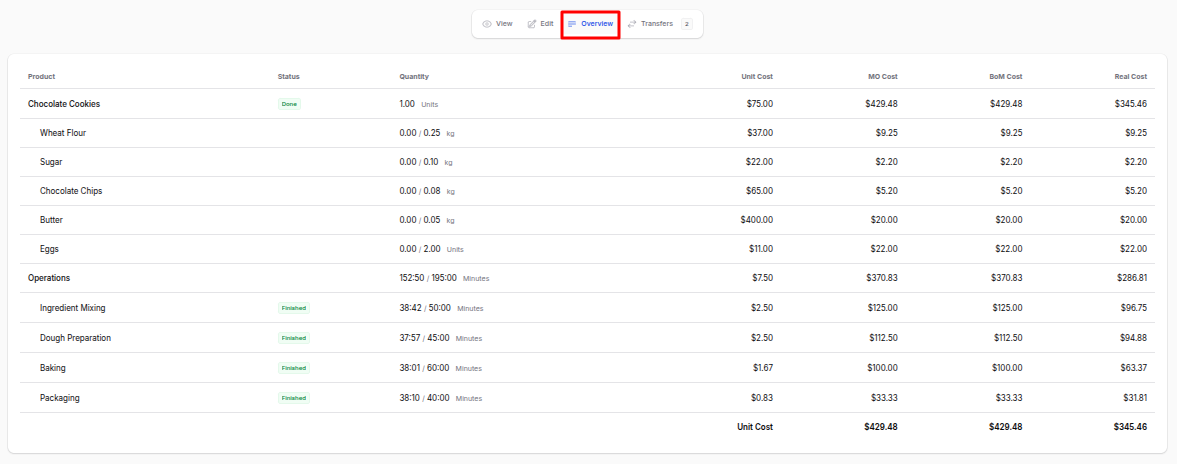
Overview: Open the MO overview report with a full hierarchical breakdown of components, costs, and durations.
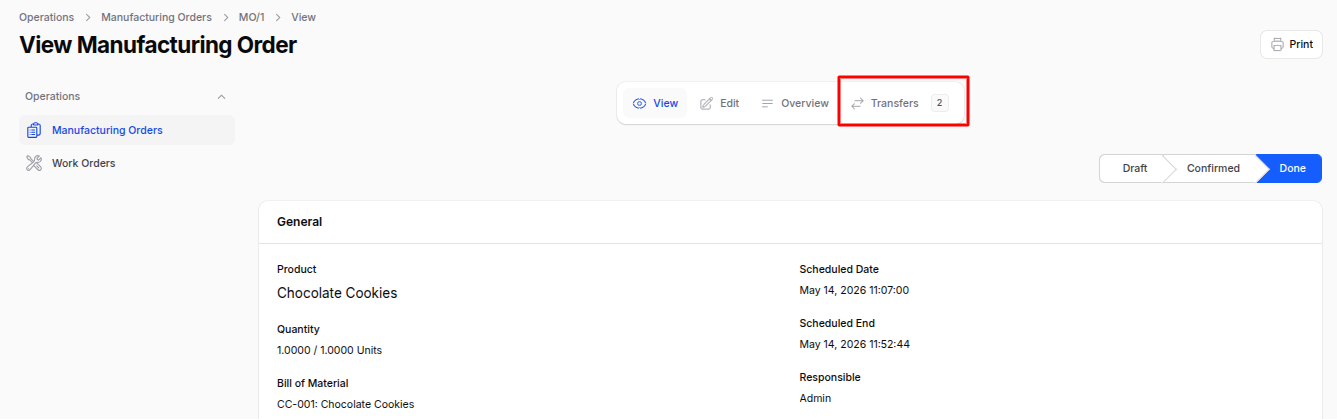
Transfers: Open the Manage Transfers sub-tab to view every stock move triggered by this MO (component picks, finished product put-away, scraps).
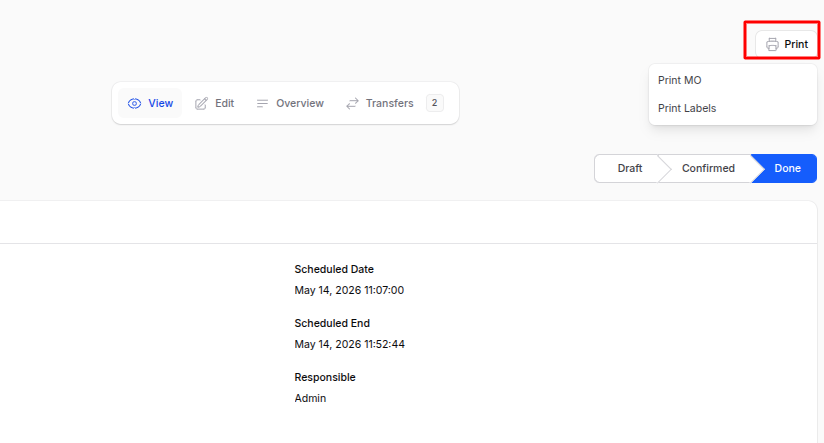
Print MO / Print Labels: Generate a printable order sheet or product labels for shop-floor use.
Edit / Delete: Modify or remove the MO (only in draft / cancelled states).
List View — Filters, Groups & Reservation State
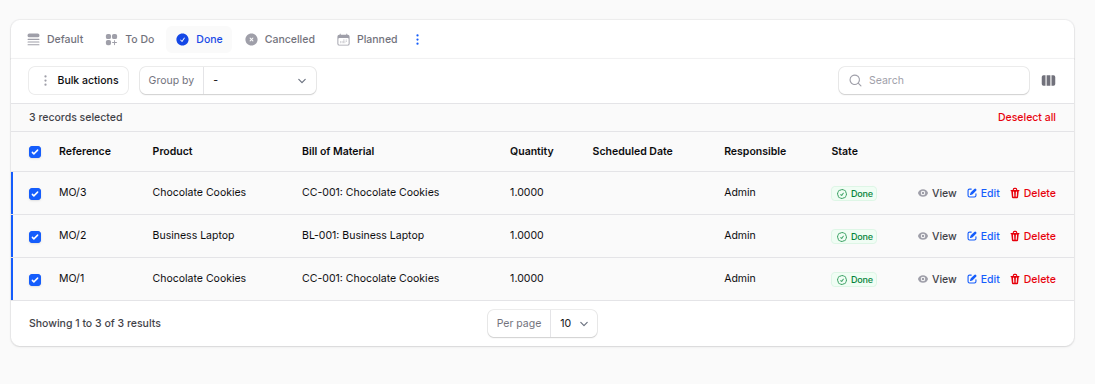
The Manufacturing Orders list shows: Reference, Product, Bill of Material, Quantity, Scheduled Date, Responsible, State, and Consumption Efficiency.
You can:
- Group by: State, Product, BoM, Responsible, or Scheduled Date.
- Filter by: State, reservation state, product, responsible, or scheduled date range.
A color-coded badge on each row indicates the Reservation State (e.g. Confirmed, Waiting Another Operation, Ready) so you can spot blocked orders instantly.
Summary
A Manufacturing Order is the central hub of production — it ties together the Bill of Material, components, Work Orders, by-products, and transfers.
Use the workflow buttons (Confirm → Plan → Start → Produce All) to drive it through its lifecycle, and rely on the overview and transfers tabs to verify the full picture before marking it complete.
Complete Manufacturing Flow — Start to End
The diagram below shows the full journey, from the very first setup step to a finished product in stock. Steps 1–5 are one-time setup (do them once, reuse them forever). Steps 6–7 are repeated every time you produce something.
        ┌──────────────────────── ONE-TIME SETUP ────────────────────────┐

  STEP 1                STEP 2                 STEP 3
┌─────────────┐      ┌──────────────┐      ┌──────────────┐
│  Create the │      │  Create the  │      │   Create     │
│  FINISHED   │ ───▶ │ RAW MATERIAL │ ───▶ │ WORK CENTERS │
│  PRODUCT    │      │ / COMPONENTS │      │ (where work  │
│ to be made  │      │ used to make │      │  is done)    │
│             │      │   it         │      │  *optional*  │
└─────────────┘      └──────────────┘      └──────────────┘
                                                   │
                                                   ▼
  STEP 6                STEP 5                 STEP 4
┌─────────────┐      ┌──────────────┐      ┌──────────────┐
│  Create the │      │   Add the    │      │  Create the  │
│ MANUFACTURING│ ◀── │  OPERATIONS  │ ◀── │ BILL OF      │
│   ORDER     │      │ (shop-floor  │      │ MATERIAL     │
│   (MO)      │      │  steps)      │      │ (the recipe) │
│             │      │  *optional*  │      │              │
└─────────────┘      └──────────────┘      └──────────────┘
        │
        └──────────────────────── PRODUCTION RUN ────────────────────────┐

  STEP 7 — Run the Manufacturing Order through its workflow:

   Draft ─▶ Confirm ─▶ Plan ─▶ Start ─▶ Produce All ─▶ Done
            (reserve   (schedule (begin    (finish &       (finished
            materials) work     work)     post to stock)   goods in
                       orders)                              inventory)
Step-by-step explanation
- Create the finished product — Add the item you want to manufacture (e.g. Wooden Chair). See Products.
- Create the raw materials / components — Add every part needed to build it (e.g. Wood Plank, Screws, Fabric). These are also created as products. See Products.
- Create the Work Centers (optional) — Set up the machines or stations where production happens (e.g. Cutting Station, Assembly Line). Needed only if Work Orders is enabled. See Work Centers.
- Create the Bill of Material (BoM) — Build the "recipe" that links the finished product to its components and quantities. See Bills of Material.
- Add the Operations (optional) — Inside the BoM, define the shop-floor steps (e.g. Cut → Assemble → Polish) and assign each to a work center. Needed only if Work Orders is enabled. See Operations.
- Create the Manufacturing Order (MO) — Choose the product, quantity, BoM, and dates. The MO pulls in components and work orders automatically.
- Run the MO workflow — Drive the order through Confirm → Plan → Start → Produce All. When it reaches Done, the finished product is added to stock and the components are consumed.
Quick mental model: Product + Components = the "what", BoM + Operations + Work Centers = the "how", and the Manufacturing Order = the "do it now".