Warehouse Management Configuration
Warehouse Management settings help you structure your warehouse operations, define storage locations, set product movement rules, and automate warehouse workflows.
Warehouses
A warehouse is a physical storage location where goods are received, stored, and dispatched.
Use Case: Create warehouses when your business has multiple storage buildings or locations. Each warehouse can have its own process flow and locations.
Steps Create a New Warehouse
Naviagte to
Inventory → Configurations → Warehouse Management → Warehousesas shown below: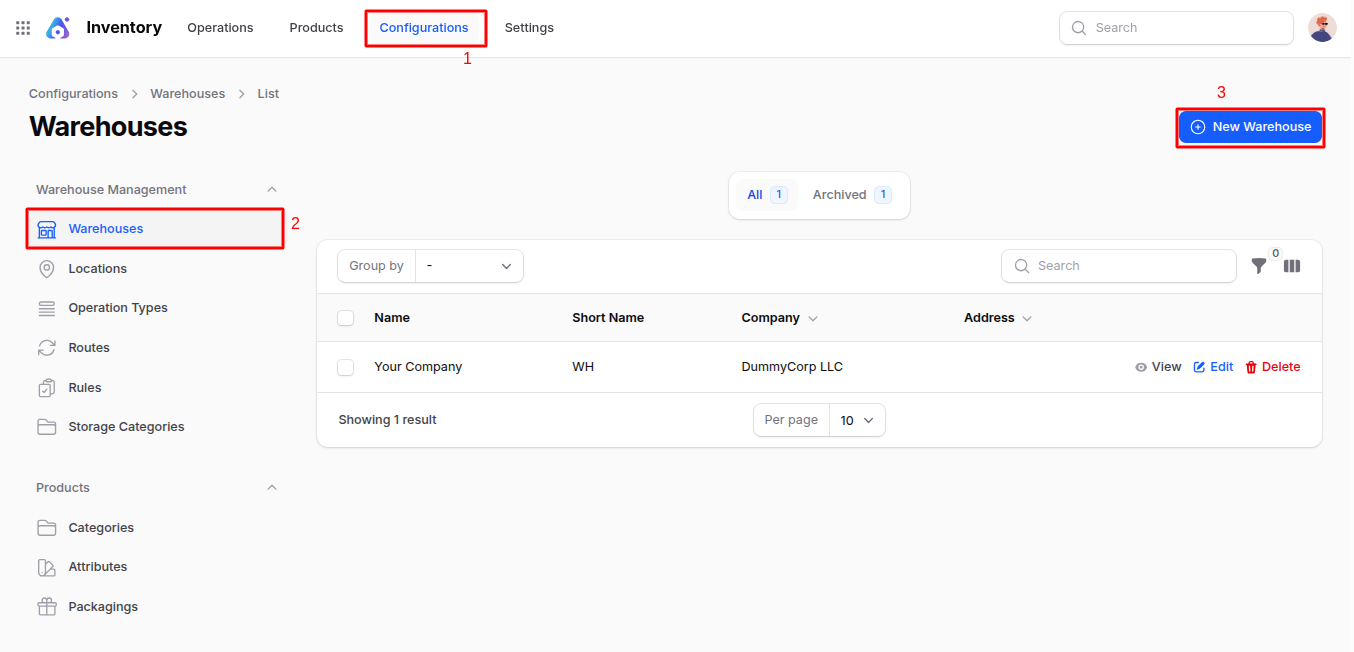
Fill the following fields:
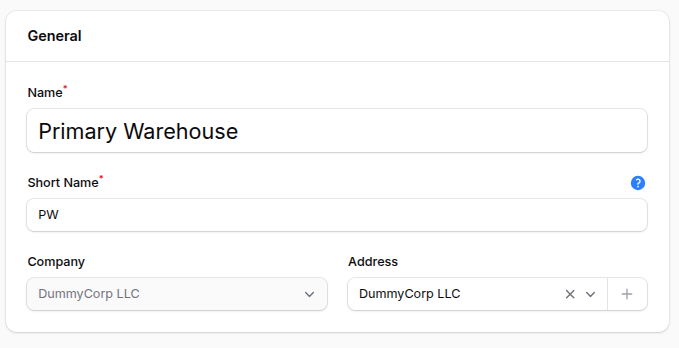
General Information
- Name: The full name of the warehouse (e.g., Central Warehouse)
- Short Name: Short identifier for the warehouse (e.g., CW)
- Company: Company owning this warehouse (useful in multi-company setups)
- Address: Physical location address of the warehouse
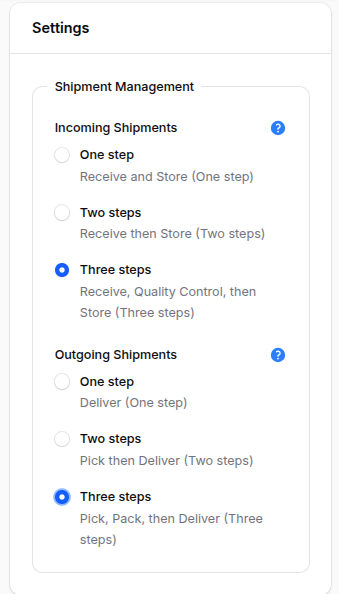
Shipment Settings
These define how products move in and out of the warehouse.
Incoming Shipments
- One Step – Receive & Store: Goods go directly to stock in one step
- Two Steps – Receive → Store: Goods received at a receiving zone, then stored
- Three Steps – Receive → Quality Control → Store: Goods received, quality-checked, then stored
Outgoing Shipments
- One Step – Deliver: Deliver goods in a single step
- Two Steps – Pick → Deliver Pick goods first, then deliver
- Three Steps – Pick → Pack → Deliver: Pick, then pack, then deliver in 3 steps
Automatic Configuration:
Based on selected shipment flows, the system automatically creates Locations, Operation Types, Routes, and Rules for the warehouse.
Action Buttons
- Create: Save warehouse
- Create & Create Another: Save and add another
- Cancel: Exit without saving
Locations
A location represents a physical area inside a warehouse such as shelves, racks, receiving zone, or packing zone.
Use Case: Create locations when you need to organize warehouse space and track stock movement accurately.
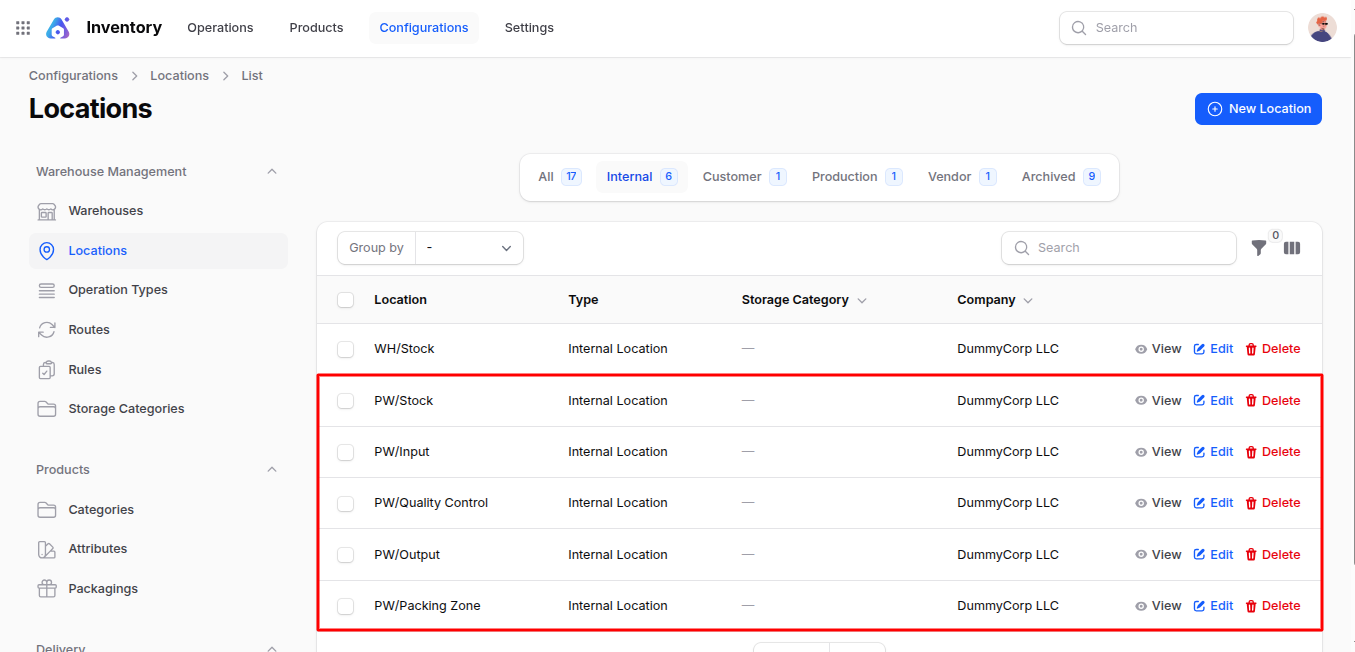
Automatic Configuration: When warehouse shipment steps are set (1,2,3 steps), default locations are auto-created. For example, in 3-step flow, system creates: Stock, Input, Quality Control, Output, Packing Zone
Steps to Create a New Location
Navigate to
Inventory → Configurations → Warehouse Management → Locationsas shown below: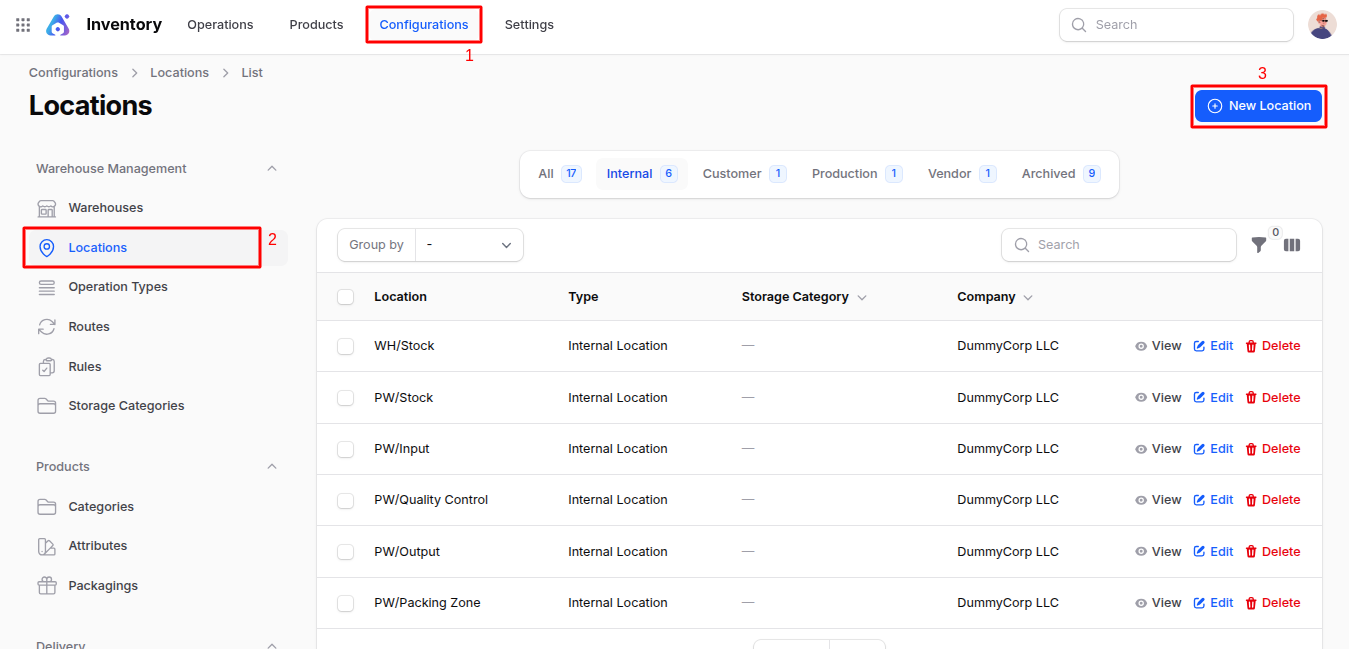
Fill in the following fields:
General Information
- Location Name: Name of the location (e.g., Shelf A, QC Zone)
- Parent Location: Select if this location is inside another location (like aisle inside warehouse)
- External Notes: Notes for warehouse team handling instructions etc.
Location Settings
- Location Type: Defines stock movement behavior
- Vendor Location: Goods received from vendor
- View: Logical grouping/no stock stored
- Internal Location: Areas inside warehouse (main storage)
- Customer Location: Location where items are shipped/sold
- Inventory Loss: Location used to adjust stock differences
- Production: For manufacturing WIP and finished goods
- Transit Location: For goods in transit between warehouses
- Company: Assign company
- Is Dock Location: Marks as loading/unloading area

Action Buttons
- Create: Save location
- Create & Create Another: Save and add another
- Cancel: Exit without saving
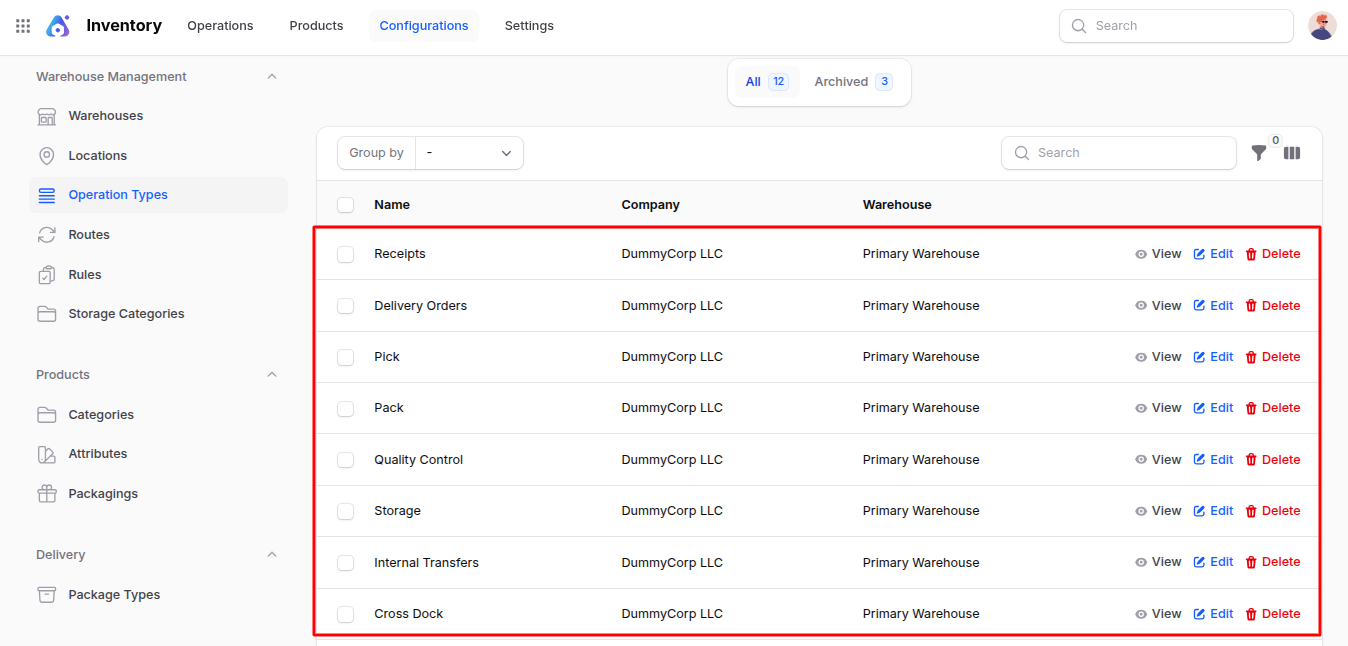
Operation Types
An operation type controls how stock moves in the warehouse, including receiving, delivery, picking, and other movements.
Use Case: Create operation types when you need to customize workflows for receipts, delivery, internal transfers, or dropshipping.
Automatic Creation: Operation types are auto-created when warehouse shipment flow is set. Example (3-step): Receipts, Pick, Pack, Delivery, Quality, Storage, Internal Transfer, Cross-dock
Steps to Create a New Operation Type
Navigate to
Inventory → Configurations → Warehouse Management → Operation Typesas shown below: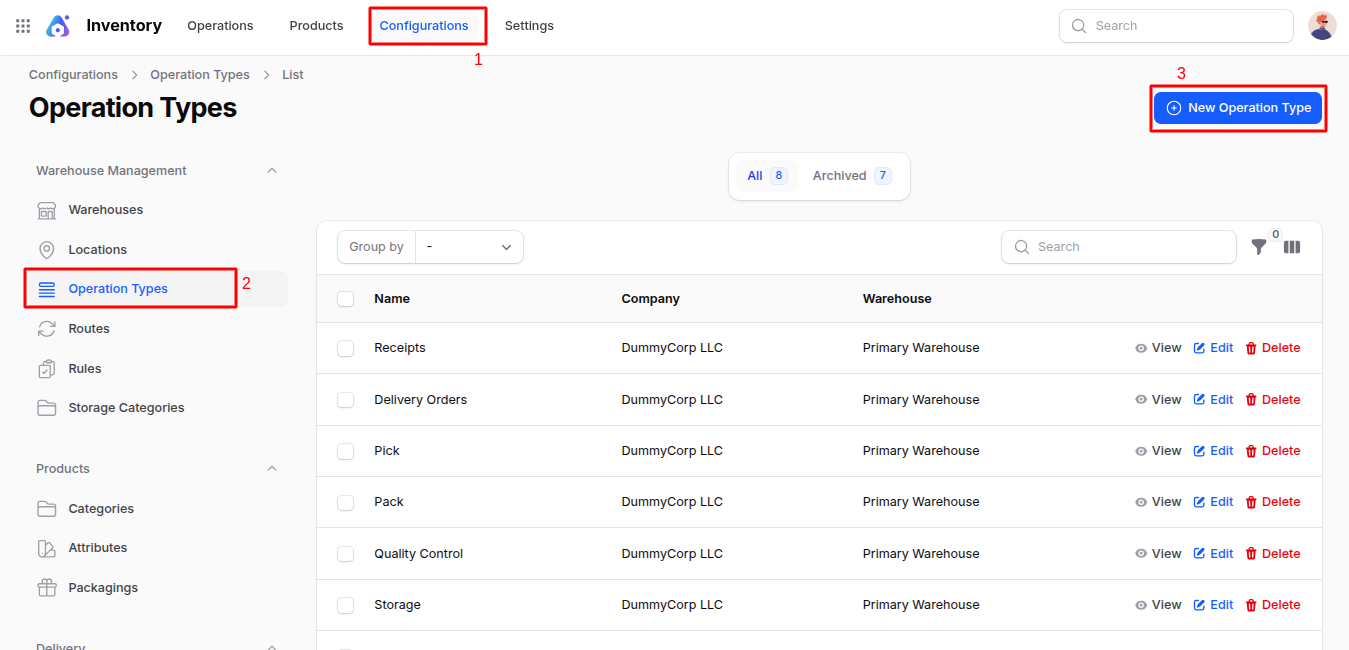
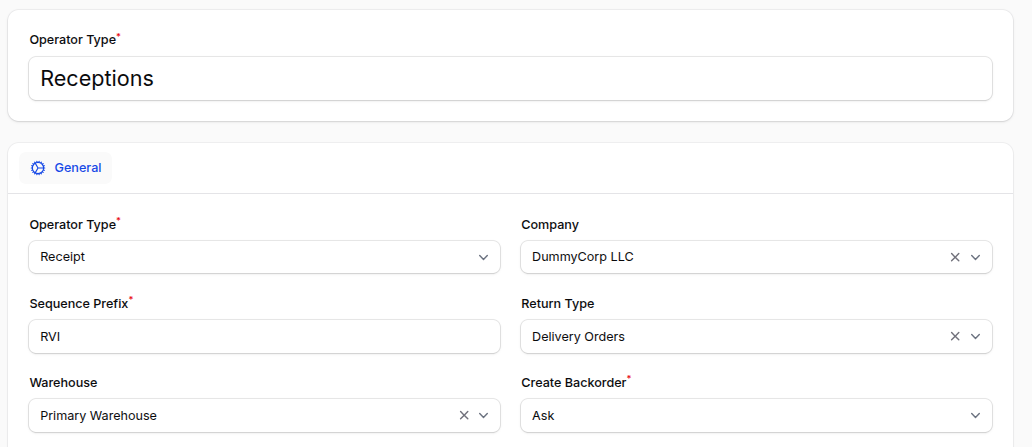
Fill in the following fields:
Basic Information
- Operation Name: Name of the operation type
- Operation Type: Select purpose (Receipt, Delivery, Internal, Dropship)
- Company: Assigned company
- Sequence Prefix: Prefix for operation number (e.g., REC-001)
- Return Type: Defines how returns move
- Warehouse: Select warehouse
- Create Backorder: Handle partial delivery (Ask/Always/Never)
Reservation Settings
- Reservation Method:
- At Confirm: Reserve stock when order is confirmed
- Manual: User manually reserves
- Before Scheduled Date: Auto-reserve before shipment date
Additional Configuration
Lots/Serial Settings:
- Create New: Create new lot/serial during operation
- Use Existing: Use existing lot/serial numbers
Location Settings:
- Source Location: Where goods come from
- Destination Location: Where goods go
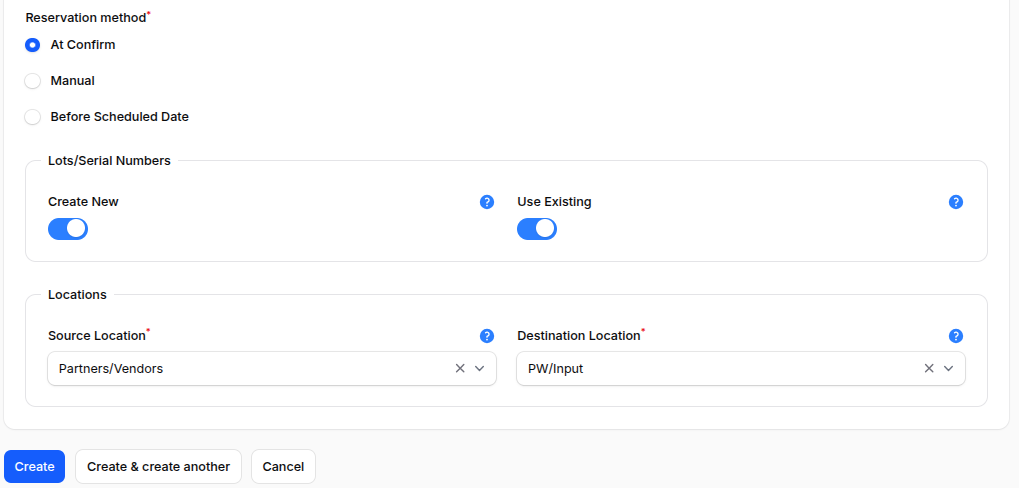
Action Buttons
- Create: Save operation type
- Create & Create Another: Save and add another
- Cancel: Exit without saving
Routes
A route defines the product movement rules inside a warehouse, determining how goods travel between locations.
Use Case: Create routes when you need to control how products travel across locations (pick-pack-ship, cross-dock etc.)
Automatic Generation: Routes are auto-generated based on warehouse setup. Example routes:
- Receive in 3 steps
- Deliver in 3 steps
- Cross-dock

Steps to Create a Route
Navigate to
Inventory → Configurations → Warehouse Management → Routesas shown below: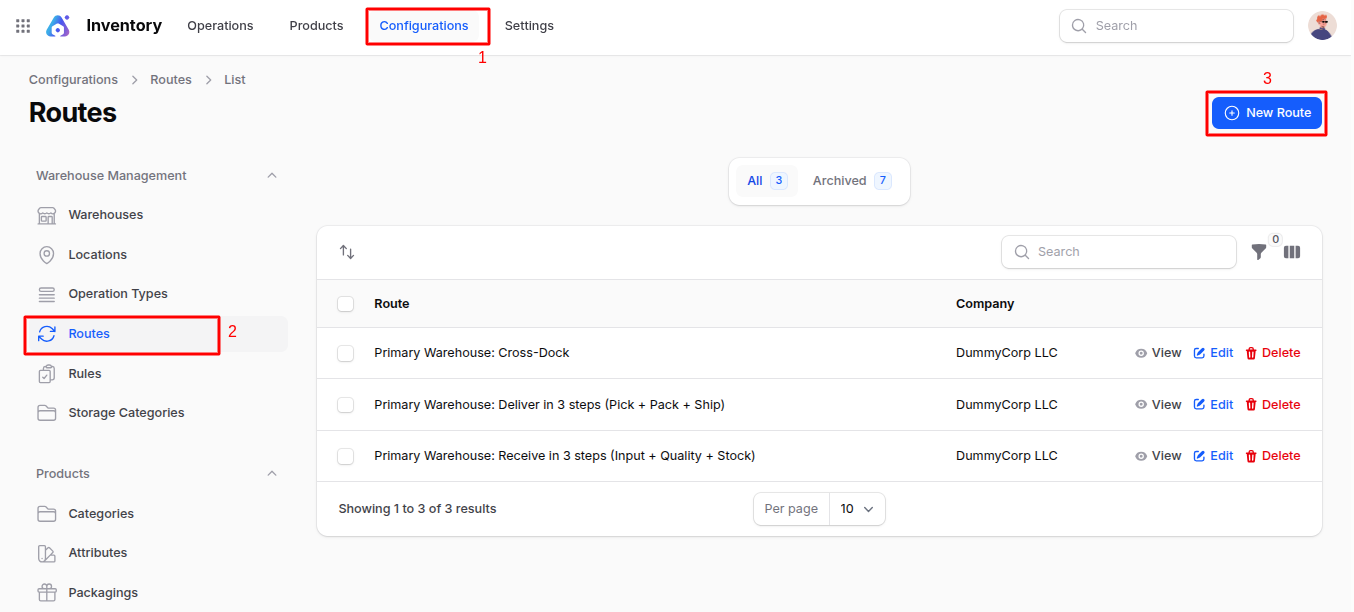
Fill in the following fields:
Basic Information
- Route: Name of route
- Company: Assign company
Applicable On Settings
Available For:
- Product Categories: Route available for product categories
- Products: Route available for products
- Packaging: Route available for packaging
- Warehouses: Select warehouse to make default route
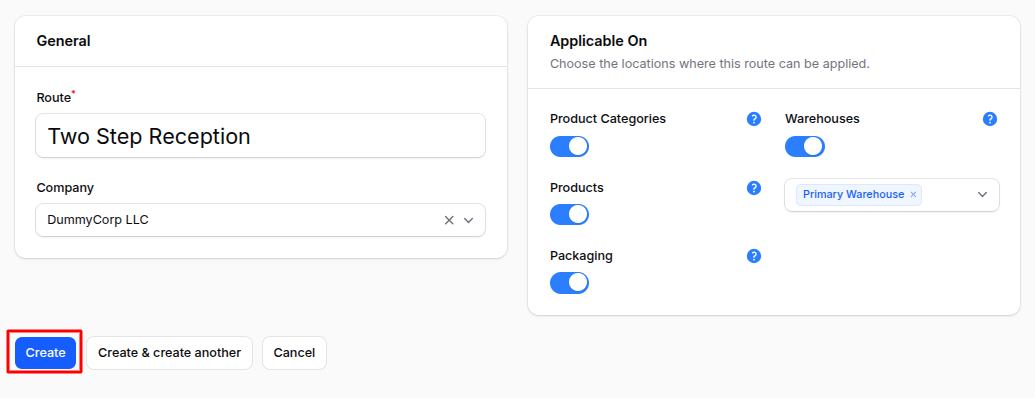
Action Buttons
- Create: Save route
- Create & Create Another: Save and add another
- Cancel: Exit without saving
Rules
A rule defines how products move within a route, automating warehouse operations and movements.
Use Case: Create rules when you need to automate actions like pull from supplier, push to packing, or move to QC.
Automatic Generation: Three actions are auto-generated:
- Pull From
- Push To
- Buy
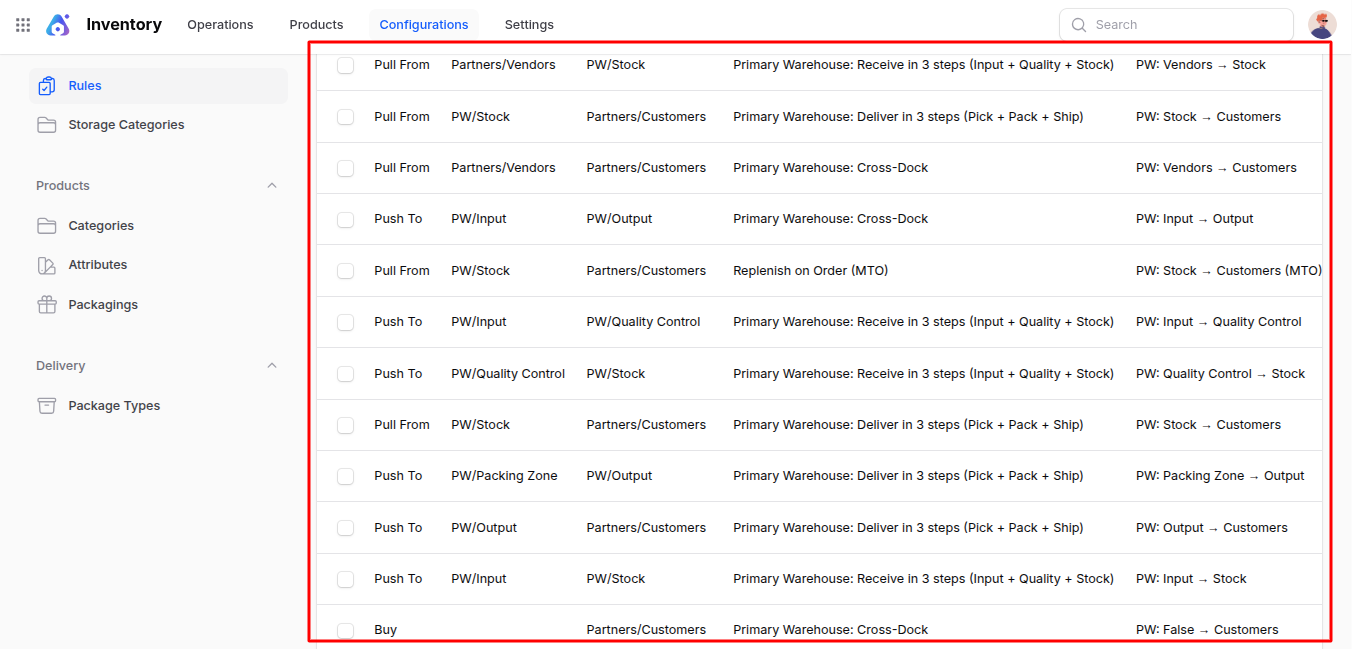
Steps to Create a Rule
Navigate to
Inventory → Configurations → Warehouse Management → Rulesas shown below: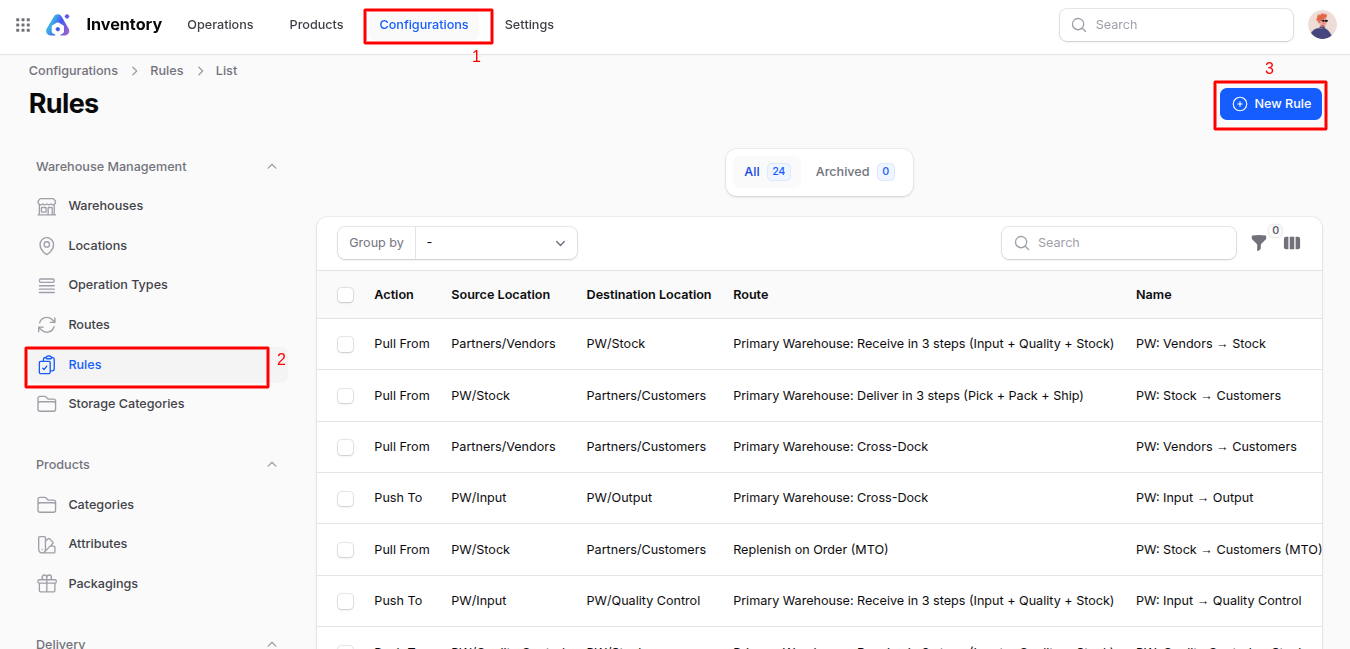
Fill in the following fields:
Basic Information
- Name: Name of rule
- Action: Select type (Pull, Push, Buy, Pull & Push)
- Operation Type: Select operation type
- Source Location: From where goods move
- Destination Location: Where goods go
Movement Settings
- Partner Address: Vendor/customer address
- Lead Time: Days required for movement
- Route: Assign route
- Company: Assign company
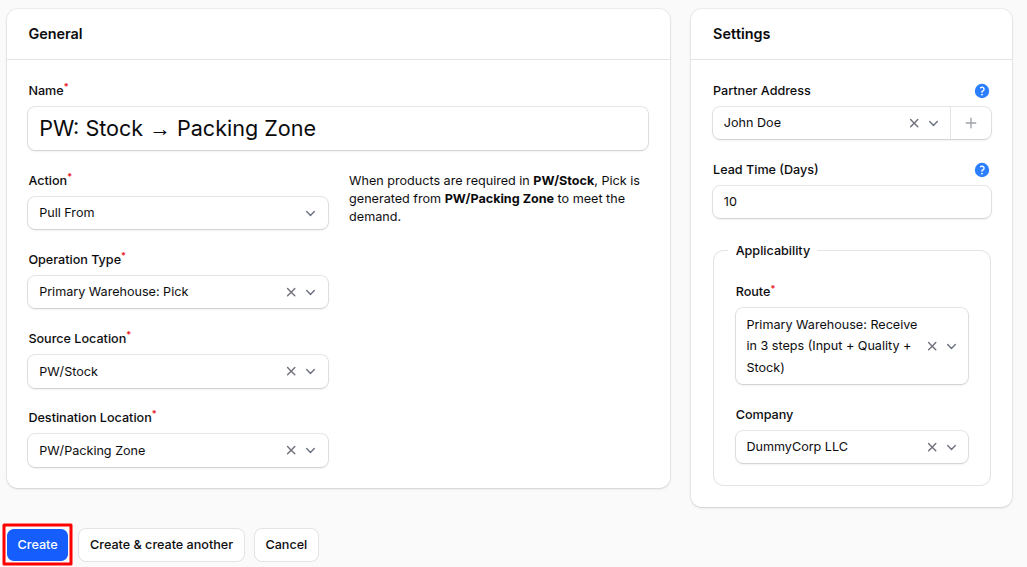
Action Buttons
- Create: Save rule
- Create & Create Another: Save and add another
- Cancel: Exit without saving
Storage Categories
A storage category helps define storage capacity rules per location, allowing you to manage space and weight limitations effectively.
Use Case: Create storage categories when you need to limit product storage by weight or quantity (e.g., shelf has 100kg capacity).
Steps to Create a Storage Category
Navigate to
Inventory → Configurations → Warehouse Management → Storage Categoryas shown below: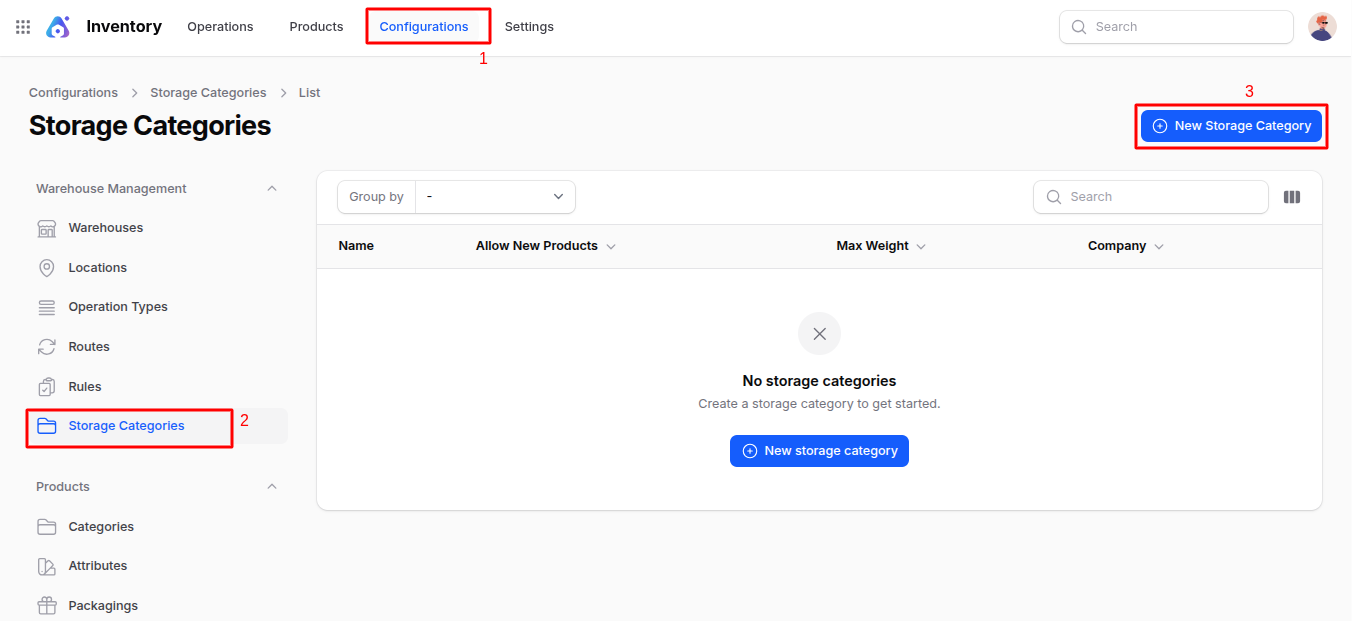
Fill in the following fields:
Basic Information
- Name: Category name (e.g., Heavy Goods Zone)
- Max Weight: Maximum allowed weight
- Allow New Products: Storage type rules:
- Mixed: Any products allowed
- Empty: Only empty slots allowed
- Same: Only same product allowed
- Company: Assign company
Additional Configuration Options
Capacity Management:
- Capacity by Package: Set capacity by packaging type
- Capacity by Product: Set capacity by product quantity
- Locations: Link storage category to warehouse locations
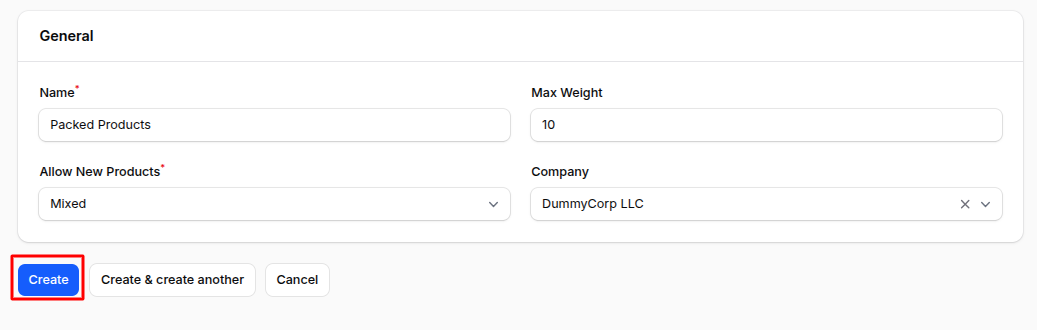
Action Buttons
- Create: Save storage category
- Create & Create Another: Save and add another
- Cancel: Exit without saving
Summary
The Warehouse Management section in Inventory helps to:
- Configure warehouses & their shipment process
- Auto-generate warehouse structures (locations, operations, routes, rules)
- Create & manage custom warehouse locations
- Define stock movement rules & automation
- Set capacity & product storage categories
In simple words:
You set up how your warehouse works, how products move in/out, where products are stored, and how operations are managed ensuring accurate and efficient inventory flow.